Evaluating and comparing drivers, designing crossovers, and assessing cabinet geometry all require quantitative engineering data as part of an efficient and repeatable design process. So the question arises — of all the measurements available to the designer, which ones are the best predictors of listener preference?
In over 30 years of designing loudspeakers, I have found the following measurements taken as a group provide the strongest predictor of loudspeaker preference available to us today. These measurements are:
• On-axis frequency response
• Impulse response
• Cumulative spectral decay
• Polar response
• Step response
• Impedance
• Efficiency/Sensitivity
• Distortion
• Dynamics
Clearly, none of these measurements quantifies “musicality” or “transparency.” However, based on my experience, it is possible to relate these measurements either singly or in various combinations to some aspect of loudspeaker quality. Let’s examine each of the above measurements in some detail. Where appropriate I will provide examples using the DAAS PC-controlled acoustic measurement systems.
Frequency Response
No other single measurement correlates more strongly with listener preference than frequency response. There has been extensive experimental research in this area. Dr. Floyd Toole and his colleagues at the Canadian Research Council and later at Harman International Industries have conducted exhaustive controlled listening tests over a period of years using both trained and lay participants. This work is summarized in an excellent white paper (1). I will not repeat the details here.
However, one conclusion of this work is “that flatness and smoothness of high resolution on-axis curves need to be given substantial weighting” in predicting loudspeaker preference.
Although in a much less rigorous study, John Atkinson, Editor of Stereophile Magazine, examined the measured frequency response of 320 loudspeakers reviewed for the magazine (2). He defined the standard deviation (SD) from flat response over the frequency range of 170Hz to 17kHz as a criterion for judging flatness of frequency response.
He then asked the question, is there any correlation between this statistic and the chance that a speaker would be added or not to Stereophile’s “Recommended Components” list? Of the 15 speakers with an SD of 1dB or less, 14 were added to the list by Stereophile reviewers. As Atkinson grouped the speakers into higher and higher SD brackets, the percentage of speakers that were selected by the reviewers for inclusion in the Recommended Components decreased proportionately.
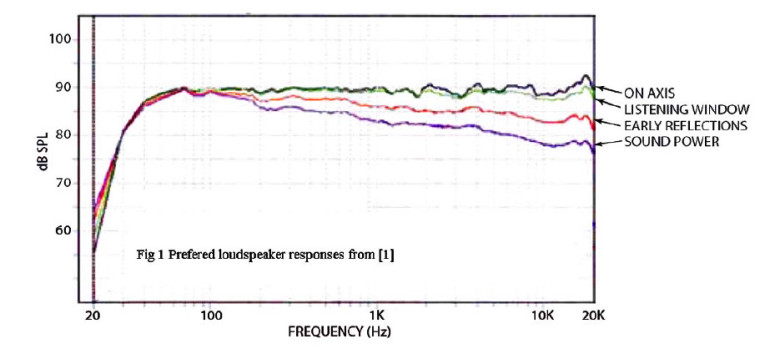
Another outcome of Toole’s paper (1) is a frequency response plot representative of loudspeakers most preferred by the listening panels. A representative version of this plot (Fig. 1) shows four aspects of frequency response: on-axis or first arrival response, listening window or average frontal response, early reflections response, and power response. The first two are essentially anechoic responses.
The first arrival response is just that — the first sound you hear from a loudspeaker. It is the primary source of localization and imaging in the case of stereo sound reproduction. This response is free of any room reflections. You may not always be able to listen on-axis, so the listening window response is an average response over a range of seating locations. It is still free of room reflections and as such represents what listeners experience in a typical seating arrangement. It also balances out subtle variations in on- and off-axis responses in both the horizontal and vertical planes.
Except for a slight rolloff at the higher frequencies, this response should look pretty much like the on-axis response. To determine listening window response I average on-axis response with off-axis responses in 5° increments from 25° left to 25° right and between 10° up and 10° down.
The third and fourth responses are representative of what you might experience in a typical listening room. The early reflections curve describes the sound of the average strong early reflections from the room boundaries. Sound power is a measure of the total sound output of the loudspeaker considering all directions. I will discuss early reflections and power response in the section on polar response.
Extensive testing has shown the on axis and listening window curves of the most preferred loudspeakers will be smooth and flat. The early reflections and power responses will be smoothly changing with a downward slope at higher frequencies (1).
With regard to frequency response, two questions arise: 1. How do we make this measurement, and 2. What departures from flat response are audible and/or objectionable? Ideally, frequency response should be measured in an anechoic chamber with the loudspeaker under test driven with a sine wave signal slowly swept through the audible frequency range of 20Hz to 20kHz. A microphone placed on a preferred axis in the far-field of the loudspeaker will then record and plot the output. The anechoic chamber guarantees that what we measure has only the sound from the loudspeaker free of any reflections. This approach also produces the highest frequency resolution.
Few of us have access to anechoic chambers. Fortunately, there are now a number of PC-based acoustic measurement systems that, when used skillfully, allow us to get close to a true anechoic measurement. All of these systems work by directly measuring or otherwise calculating a loudspeaker’s impulse response. This is a loudspeaker’s response to a sharp, narrow pulse that contains a uniform distribution of all frequencies in the audio band. This is a time domain response. Examining this response, you can easily see the arrival of later reflections and window them out of the data. The frequency response is then computed from the windowed impulse response via a Fast Fourier Transform.
Practical frequency response measurement systems do not use the impulse signal. To produce a flat spectrum over the audio band, an impulse must be much less than 50 microseconds wide. Therefore, to achieve sufficient signal levels for accurate results, the impulse magnitude must be very large, generally large enough to drive a loudspeaker into nonlinear operation. Instead, most measurement systems use some form of broadband noise together with a cross correlation operation to calculate the impulse response. I will not describe the process here.
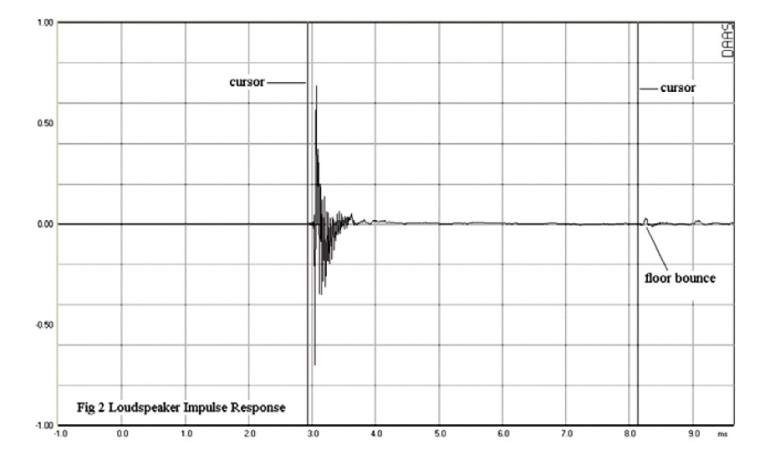
Measurement techniques using PC-based acoustic measurement systems are treated in detail in reference 3. An excellent overview of these techniques is found in reference 2. Figure 2 shows the measured impulse response of a highly regarded two-way monitor loudspeaker. This speaker uses a 180mm mid-bass driver together with a 28mm tweeter crossing over at 2.1kHz with a 4th-order acoustic in-phase crossover. This will be my primary example.
The response was obtained with the DAAS acoustic measurement system using broadband pink noise as the input signal. The measurement was made in a typical listening room, with the microphone placed on the tweeter axis at a distance of 1m. The speaker was mounted on a stand placing the tweeter at a height of 0.9m. Examining the plot, you see that the speaker output arrives at the microphone about 3msec after the signal was applied to the loudspeaker. The first reflection arrives about 5msec later at slightly over 8msec. This is the floor reflection.
Cursors have been placed at 3msec and 8msec. Only the data between these cursors will be processed. The result is called a quasi-anechoic response. Figure 3 plots the quasi-anechoic frequency response for the impulse response shown in Fig. 2. There is one drawback to the quasi-anechoic technique. In the above example the reflection-free analysis window was limited to 5msec. As a result, the lowest frequency you can extract from the data is a sine wave of period 5msec with a corresponding frequency of 200Hz.
The sloping response below 200Hz is an artifact of the FFT and does not represent valid data. Because the FFT is periodic in the fundamental frequency of 200Hz, the measurement resolution is also 200Hz. I’ll discuss the implication of this reduced resolution shortly. You can get the response below 200Hz using the near-field technique (3). The speaker under analysis uses a vented alignment. In the near-field approach a microphone is placed within 1cm of the woofer to measure its near-field response.
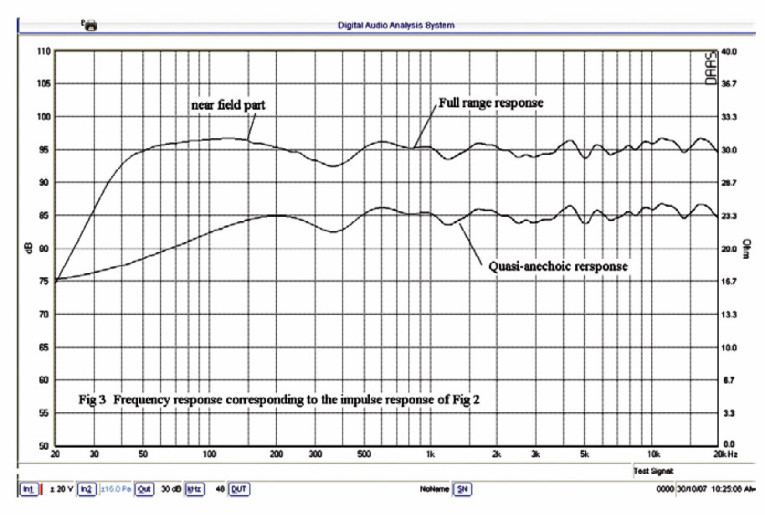
The mike is next placed in the plane of the port output and a second measurement is made. The two measurements are then combined considering both amplitude and phase, with the appropriate weighting, to get the total low-frequency response. This response is generally valid up to a few hundred hertz. DAAS accomplishes this process using its “combine vent and woofer” routine. The result is also shown in Fig. 3, where the low-frequency nearfield response has been spliced to the quasi-anechoic response at 300Hz. The curves are offset by 10dB for clarity.
Let’s now turn to the second question: What departures from flat response are audible and/or objectionable? A rise in the bass region will lead to a “boomy” or “muddy” sound. With a rise in the treble region, the speaker will sound “bright” or “detailed.” The high frequency boost will add an exaggerated “sparkle” to cymbals and triangles and an “etched” quality to trombone blats. If the high-frequency rise is excessive, all sounds will have an added “sizzle.” A broad shallow dip in the midrange can make the speaker sound “dark” with the image “recessed.” (Notice I have used subjective terms to describe the effect of the frequency response errors.)
Peaks and dips are a major manifestation of frequency response anomalies. Peaks in frequency response are caused by resonances and can be characterized by a central frequency, and a Q that is associated with the height and width of the resonance. Toole and Olive have investigated the audibility of resonances (4).

Figure 4 shows the detection threshold for resonances of various Qs in the presence of typical program music. You see that very narrow resonances (high Q) must be about 10dB above the average level to be heard, whereas very broad resonances need only be 1 to 2dB higher to be detected. This is fortunate because the limited resolution of quasi-anechoic responses may prevent you from seeing high Q peaks, but still allow you to find the lower Q resonances. The best way to identify resonances is via the cumulative spectral decay (CSD) discussed in the next section.
Peaks and dips are also caused by diffraction off cabinet edges and abrupt changes in baffle contour. I have seen tweeter diffraction effects caused by proximity to woofer surrounds and raised woofer baskets. Although diffraction effects can also be seen in the CSD, off-axis response plots are more useful for identifying diffraction. Resonances are inherent in the speaker response and will persist at all off-axis angles. Diffraction responses, however, are angle dependent and tend to disappear off-axis. Diffraction effects can sometimes be revealed via cepstral analysis. I will examine diffraction effects a bit later.
Cumulative Spectral Decay
The cumulative spectral decay (CSD) gives a detailed analysis of loudspeaker resonances. The CSD measures the frequency content of a loudspeaker’s decay response following an impulsive input. Ideally, a loudspeaker’s impulse response should die away instantly. Real loudspeakers, however, have inertia and stored energy which take a finite time to dissipate. The CSD involves a series of frequency domain calculations. It is represented by a three-dimensional plot.
On the CSD plot, frequency increases from left to right and time moves forward from the rear. The first slice analyzes the impulse response out to a fixed end point, which you can select by appropriate placement of a cursor. It is usually selected as that point in time just before the arrival of the first reflection so that the first slice is the quasi-anechoic frequency response in Fig. 3. Succeeding slices are foreshortened toward this end point, including less and less of the impulse response tail with each succeeding slice. The FFT of these slices yields the frequency content of later and later portions of the impulse response. The CSD is most useful in identifying resonances, which appear as ridges moving forward along the time axis.
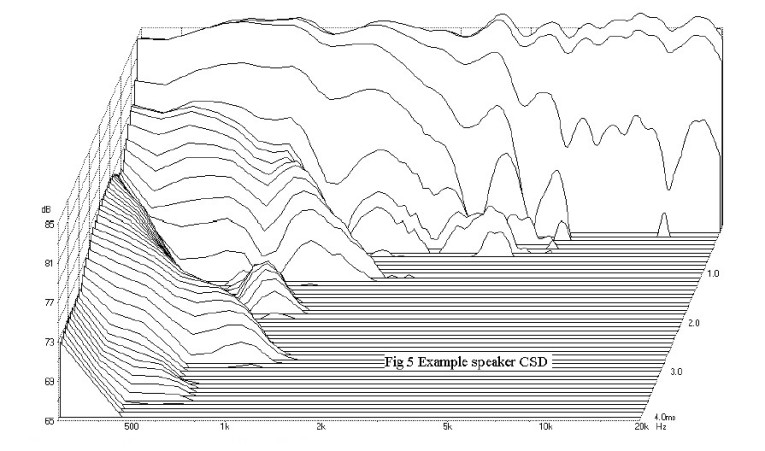
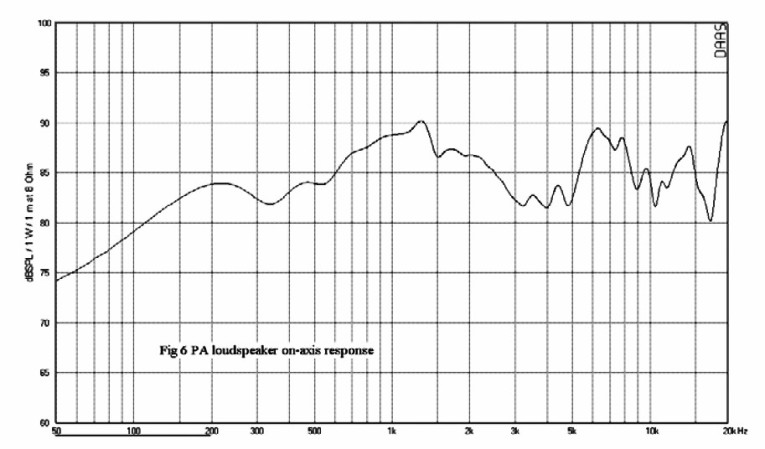
Figure 5 is a CSD plot for the loudspeaker previously analyzed in Fig. 3. The plot’s dynamic range covers 20dB. Frequency ranges from 300Hz to 20kHz. The crossover frequency from the woofer to the tweeter occurs at 2.1kHz. Notice that frequencies above 5kHz decay very rapidly, being down by 20dB in less than a millisecond. At first glance there appears to be a very slow decay of low-frequency energy. The plot shows substantial signal level below 500Hz at 4ms. Again, this is an artifact of the FFT processing. Remember that you are analyzing only the first 5ms of the impulse response. By the time you get out to 4msec, you are analyzing the last 1msec in the tail of the impulse response and the resolution is now 1000Hz. Data below this frequency is not valid. I’ll discuss ways to improve low-frequency accuracy shortly.
Figure 3 represents a rather good loudspeaker. The CSD shows no significant resonances. Look at some more revealing CSD plots from lower quality loudspeakers. Figure 6 depicts the frequency response of a small two-way loudspeaker used in a voice announcing (PA) system. You can see major response peaks at 1.4kHz and 14kHz and the start of a third peak just below 20kHz. There are also many small ripples in the 6 to 10kHz range.
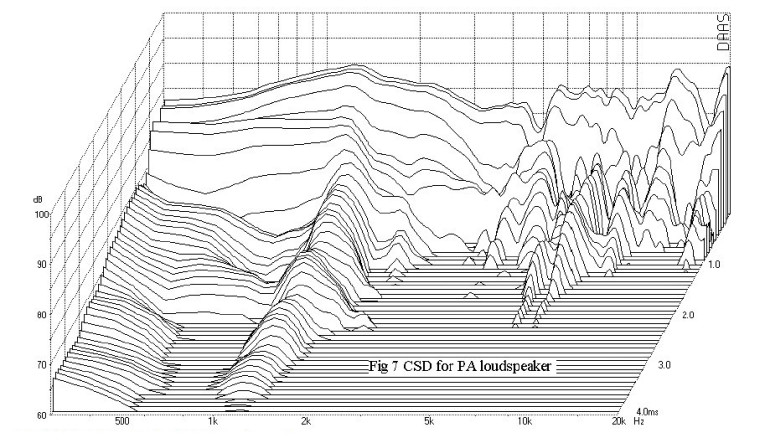
The CSD for this speaker is shown in Fig. 7. This plot covers a dynamic range of 20dB. Most prominent is that the broad ridge is associated with the 1.4kHz resonance which extends out to 4msec. The ripple responses extend out to more than 2msec while the 14kHz resonance dies away in about 1msec. Figure 7 gives a rather revealing picture of this speaker’s decay response. This speaker sounds highly colored on music selections, but is adequate for voice in a PA application.
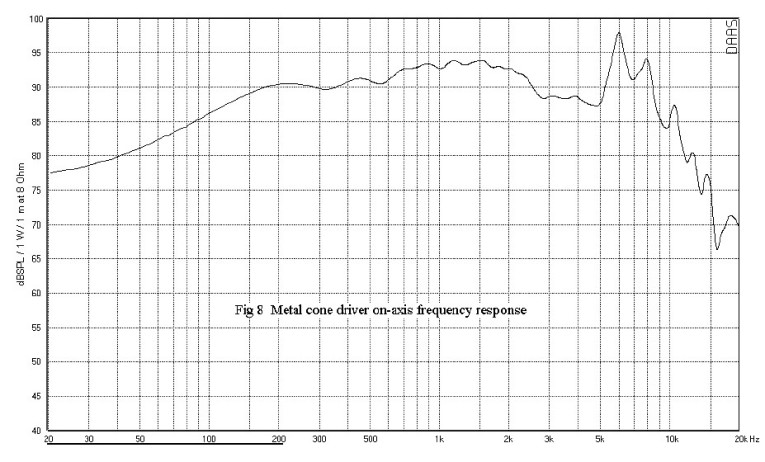
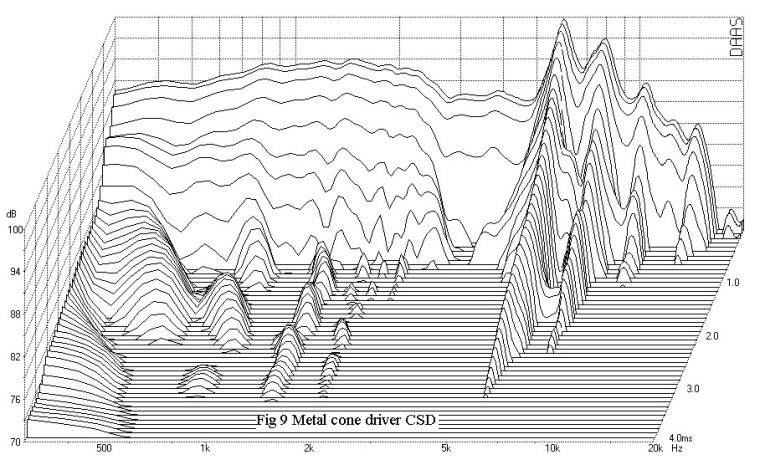
The frequency response of a metal cone 5.25″ mid-bass driver is shown in Fig. 8. The driver displays response peaks at 6, 8, and 10kHz. The CSD (Fig. 9) shows prominent ridges at those same frequencies. The resonance at 6kHz takes 3.2msec to fall by 30dB. There are also delayed resonances popping up at 1, 1.5, and 2kHz. They are called delayed resonances because they are not apparent from an examination of the frequency response curve, but appear later in the CSD. This driver was used successfully as a midrange in a three-way loudspeaker. To do this, however, its upper frequency was limited to 2.5kHz and a steep slope crossover was used to suppress the response above that frequency.
The Periodical CSD
We have seen that CSD loses low-frequency accuracy. Is there a way to increase low-frequency resolution? Let’s do a little math first. Mathematically a resonant response can be represented by a time decaying sine wave. The formula for this response is:

where: r(t) = resonant response
e = base for the natural logarithm
fr = resonant frequency
t = time in seconds

and Q = Q of the resonance
From (1a) you see that the resonance decay is directly proportional to the resonant frequency and inversely proportional to Q. That is, for the same Q, higher frequency resonances decay more rapidly than low-frequency ones. In fact, higher frequency resonances often decay so rapidly on a time scale that they are missed in the CSD. We can fix this. The period, T, of the sine wave in (1) above is given by:


and if you let t = nT then

where n is an integer representing the number of periods in the decay response. If you now plot the CSD in units of periods instead of time, you see that the decay plot is independent of frequency and only a function of Q. Plotted in this manner, the CSD is called the periodical CSD, or PCSD. Regardless of the peak frequency, fr , resonances with the same Q will look the same on the PCSD plot.
DAAS computes the PCSD directly in the frequency domain using sine wave tone bursts as the input signal. The PCSD is generated by exciting the loudspeaker with a sequence of pulsed sine waves. Figure 10 is a plot of the PCSD for my example loudspeaker made with a sequence of 150 logarithmically spaced sine waves covering the same frequency and dynamic ranges as those of Fig. 6.
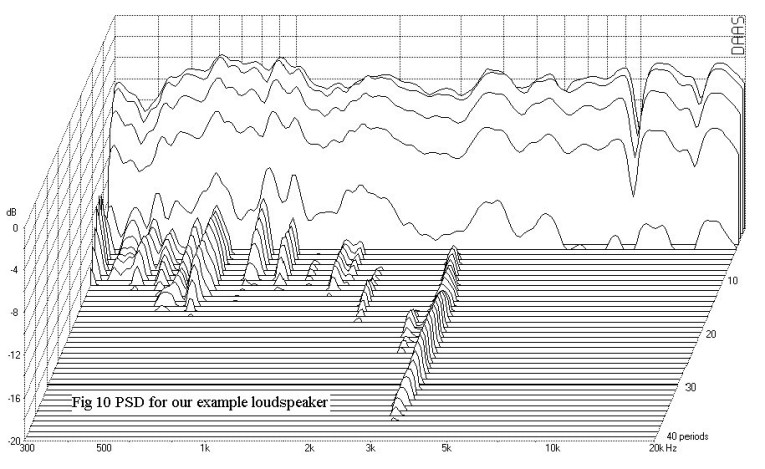
Now you see distinct ridges below 1kHz and a delayed resonance at 3kHz. Unlike the CSD, the PSD time scale varies with frequency. For example, the 500Hz resonance shown in Fig. 10 lasts for about 15 periods, which is a time span of 30msec. This extended time scale can lead to errors in the PCSD if the test is made in a reverberant enclosure. The 3kHz ridges run out to 37 periods, or about 12msec.
The CSD is made using a broadband pink noise input signal. With this signal all resonances will be excited, but with little energy in any particular resonance. The pulsed sine waves are relatively narrowband. If a sufficient number are used in the input sequence, one is likely to fall within the bandwidth of a resonance providing a high level of excitation. The PCSD provides better low-frequency resolution and finds higher frequency resonances possibly missed in the CSD. On the downside, the PCSD can be corrupted by echoes in a reverberant environment.
Summarizing, the CSD and PCSD are useful tools in analyzing loudspeaker resonant responses. They often reveal subtle resonances not immediately obvious when viewing frequency response plots alone.
Diffraction Responses
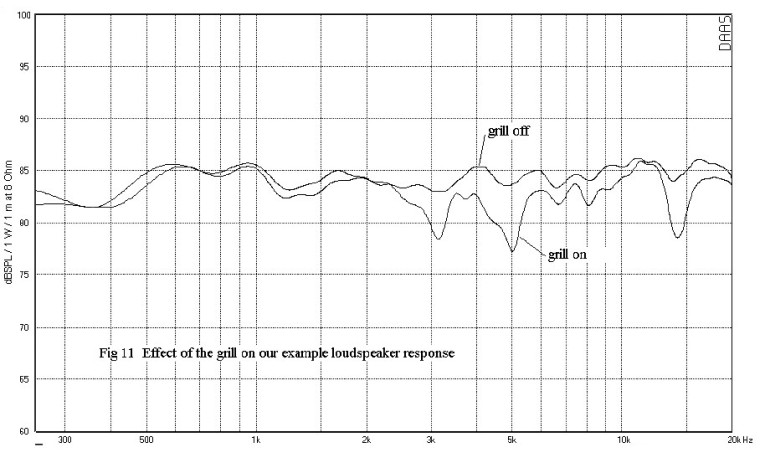
I mentioned that diffraction effects can also produce response peaks and dips. These peaks and dips may persist in the CSD and be confused with resonances. Fortunately, diffraction responses are angle dependent and can often be isolated by looking at off-axis responses. So far all the frequency response plots of my example loudspeaker have been taken with the grille off. Figure 11 compares the on-axis responses both with the grille on and with the grille off. Relative to the grille off response, you can see severe response dips at 3, 5, and 14kHz and a broader peak at 12kHz. The grille frame presents an abrupt discontinuity on the baffle.
As the wave front expands outward toward the baffle edges and hits this discontinuity, a secondary wave is generated with reverse phase. This wave interferes with the primary wave causing a combing response of peaks and dips. Because the grille frame is only 7mm thick, it has little effect on frequencies below 3kHz. Due to the grille frame symmetry, secondary waves from both grille frame edges are in phase with each other causing maximum perturbation of the primary wave from the tweeter when the microphone is on-axis. As one moves off-axis, one grille frame edge moves closer to the mike while the other moves farther away. They are no longer in phase with each other at the mike position, so the diffraction effect is greatly reduced.
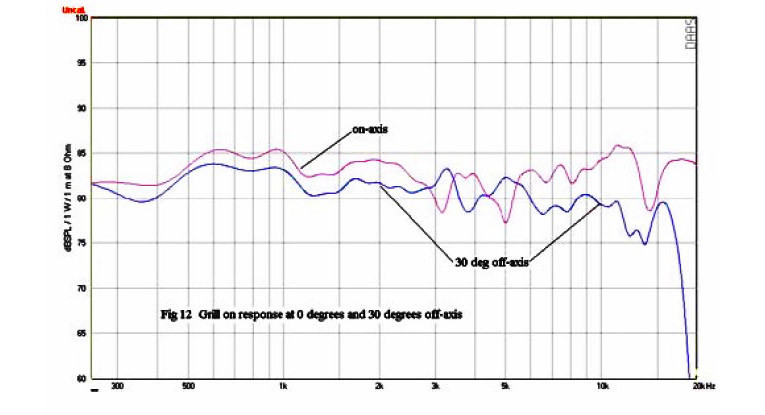
This is in contrast to a resonance, which is inherent in the driver and will persist at all angles. Figure 12 compares the grille-on response on-axis with the grille-on response at 30° off-axis in the horizontal plane. You can see that the severe dips are gone and replaced with smaller variations at different frequencies. This confirms what we already know, that the response variations are caused by diffraction and not resonances.
There is another way to analyze diffraction and reflections in general. This can be done by computing the power cepstrum. Formerly, the cepstrum is the inverse Fourier Transform of the logarithm of the complex frequency response. Why would anyone want to compute this strange quantity? Well, a reflection or diffraction event can be thought of as the mathematical convolution of the input signal with a time delayed version of the system impulse response. Now convolutions in the time domain transform into products in the frequency domain. If you take the logarithm of the frequency response, the products break apart into sums. The transforms of the delayed impulse responses have large linear phase components which transform back as a time shift in the time domain. So we get the initial log impulse response plus delayed (and possibly distorted) replicas of the log impulse response in the cepstrum.
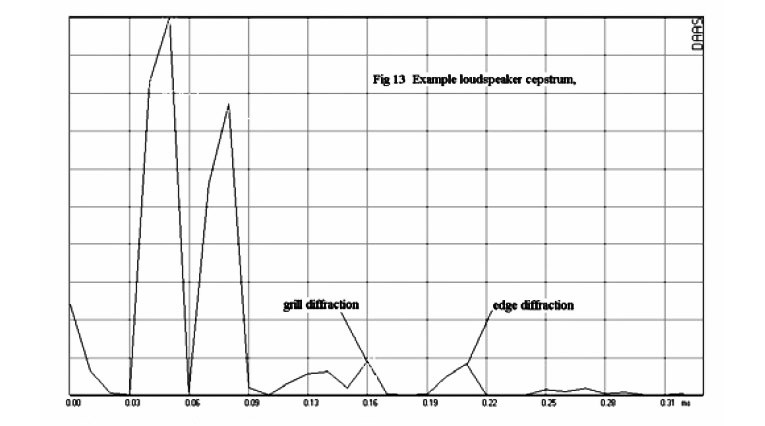
Figure 13 is a plot of the power cepstrum for my example loudspeaker taken with the grille on. There are several spikes in the cepstrum plot. In my diffraction example the inside edge of the grille frame edge is 5.5cm from the tweeter axis, so the diffracted wave is approximately 160μsec behind the main response. You can see a point on the cepstrum plot at 160μsec. Interestingly, the cepstrum also tells us that there is a second reflection off the outside edge of the grille at 210μsec.
You must be careful in interpreting the cepstrum. To see the delayed response clearly, the initial impulse response must have decayed sufficiently so as not to hide the delayed response. The earlier spikes in the plot of Fig. 13 are from the initial impulse and do not represent reflected or diffracted responses.
In the second part of this article we’ll continue our look at those measurements that best determine listener preference.
References
1. Toole, Floyd E., “Audio-Science in the Service of Art,” available at harman.com
2. Atkinson, John A., “Measuring Loudspeakers, Part Three,” Stereophile, January 1999, available at www.stereophile.com.
3. D’Appolito, Joseph A., Testing Loudspeakers, Audio Amateur Press, 1998, www.audioXpress.com cc-webshop.com.
4. Toole, F.E., and S. E. Olive, “The Modification of Timbre by Resonances: Perception and Measurement,” J. Audio Eng, Society, vol. 36, pp. 122-142 (1988 March).
This article was originally published in audioXpress, September 2008


