I recently had the pleasure of working with new power amplification and power supply modules from Hypex, a Dutch company, which has been at the forefront of the development of Class-D amplification. The NCore amplification is a self-oscillating topology with high power, high performance, and relatively low load dependence. This is achieved via extremely high negative feedback, stabilized by a manipulation of the loop gain. The NCx500 modules I recently also had on my workbench were intended for designers who want to use them as components in products, integrating them into stand-alone amplifiers or as part of active loudspeakers.
Although there’s no lack of integrators out there, a lot of people still want greater participation in the process but are intimidated by the engineering requirements or just don’t have the time to do a design even with prefabricated modules. There’s also the question of integrator competence — many of the ones I’m familiar with are extremely good, but there’s always a risk. And a lot of details can have a profound impact on the performance of the finished product, not just things like distortion and noise, but oddball turn on and turn off thumps and unwanted sound effects. Wouldn’t it be nice to have an integrated, ready-to-use version of ultra-high-performance amplification that is reliable and lets you get your hands into the works?
Enter the new Nilai DIY Class-D power amplifiers and preamplifiers from Hypex. When I questioned Hypex’s Frank Veldman about the differences between the Nilai amps and the new NCx500, he responded, “Whereas NCOREx is considered more of an update to NCORE, using the same concepts, Nilai does go further creating a higher-order feedback loop and thereby increasing loop gain within the audio band further.”
Veldman elaborates: “The aim with Hypex amplifiers has always been to have excellent performance across the entire audio band, for UcD and NCORE this meant distortion levels were practically frequency independent. For the development of NCOREx and Nilai this has been reconsidered and while extensive (listening) tests obviously showed the importance of proper high frequency performance, it did not necessarily lead to full frequency independence. For new developments this meant high frequency performance has been as important as ever in Hypex designs, the philosophy of what is happening below that changed to some extent.
“These new insights can be seen in the performance of both NCOREx and Nilai, the main difference here is that the Nilai adds another 15dB of loop gain, resulting in a total of >75dB across the entire audio band. In the current Nilai500 DIY module this increase in loop gain has not only been used to improve performance, but like the NCx500, part of it has been used to offset the increase in open loop distortion of the power stage originating from the desire to further improve its efficiency. In the current Nilai amplifier (and this will be the same for any future implementations) we have sacrificed performance for improved efficiency on the power stage end of the amplifier, this mostly comes down to increasing deadtime. The extra loop gain we have with the Nilai is in part used to counter the negative effects this has on distortion, therefore the actual distortion measurements, while I think they look excellent, don’t quite resemble the huge improvements there are over, for instance, NCORE.
“Because of the choice for a fully complete discrete amplifier with input stages and such all running Class A, total efficiency of the module is not exceptional. When purely looking at the power stage of the amplifier, we are looking at about halving the idle losses compared to the known NCORE amplifiers.
“A second, smaller benefit in the Nilai is the improvement of its frequency response which is now basically flat in the audio band. This is combined with a second-order roll-off, which makes it less susceptible to HF noise. NCORE is usually down about 0.5dB at 20kHz, the NCx500 has slightly increased bandwidth and thereby at about 0.25dB, both having a first-order roll-off. Nilai being a second-order roll-off is indeed easily flat to 20kHz and actually a bit beyond that.”
The technology used for the preamplifier is much more conventional, comprising discrete op-amps and the same regulators (at least visually!) as used in the input stages of NCx500 amps. The “Class D” on the front panel is branding rather than a description of the circuit (although the power supply is switch mode).
The Products
For those old enough to remember the old Heathkit, Eico, and Knight Kit products, the Nilais will seem a bit odd — the boards containing the signal and control circuitry are preassembled. This is a good thing in 2023 since surface mount parts are difficult for a lot of people (like me!) to handle. And the high frequencies involved in switching circuits make small details of lead dress and grounding extremely critical. So the Nilai kits are more reminiscent of the old Dynakits, which were among the most popular audio products of the 1950s and 1960s and came with pre-populated circuit boards. But unlike the Dynakits, the interconnections to the power supply and I/O are all done with plug connectors- no soldering needed.
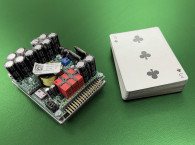
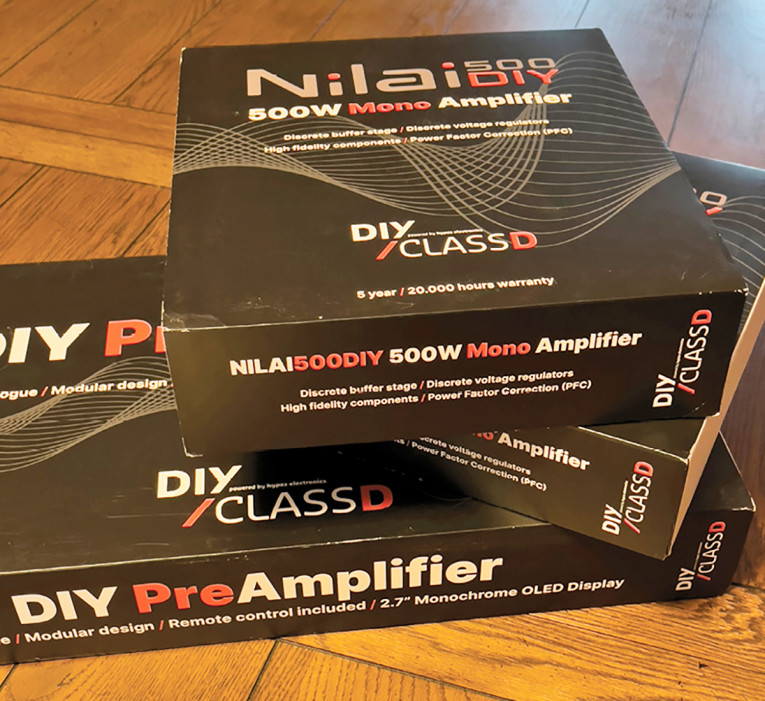
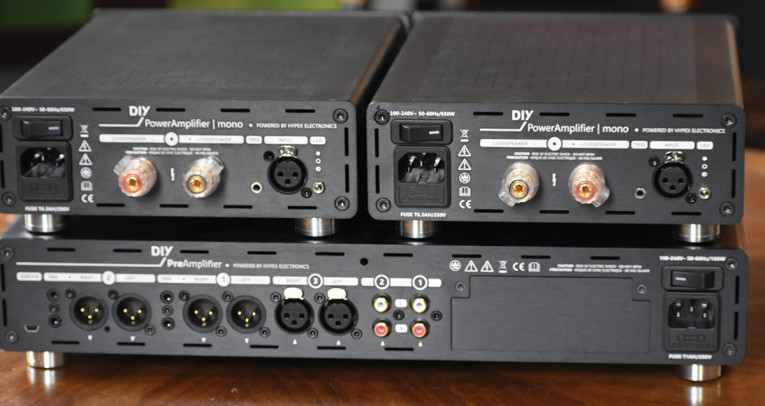
I call the images shown in Photo 1 (above) and Photo 2 “Christmas in February.” The power amps and preamp parts arrived in attractive boxes just begging for an unboxing video — my YouTube presence being minimal, I’ll leave that to someone else. The assembly instructions are done graphically, giving this an Ikea-like international feel. The diagrams are clear and easy to follow.
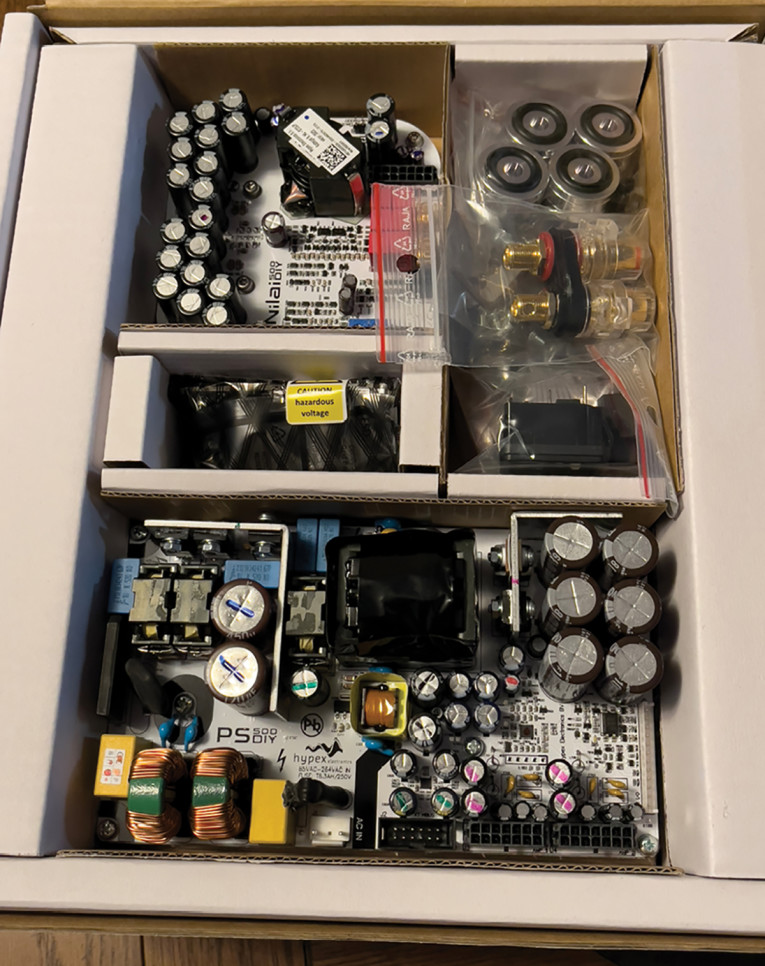
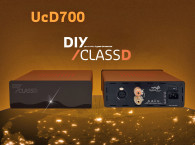
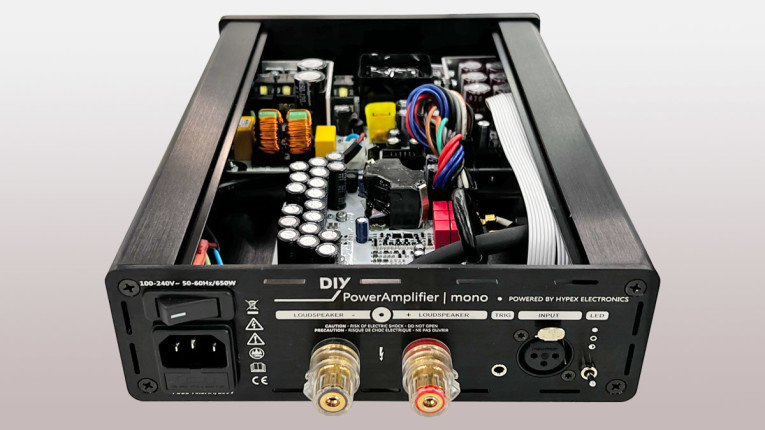
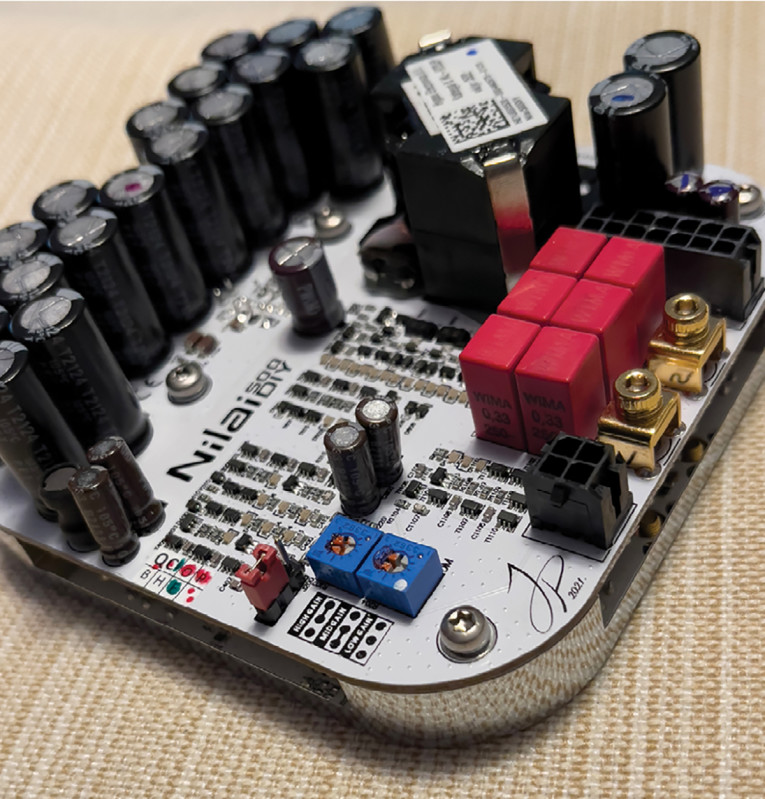
The heart of the DIY Class-D power amplifier unit is the Nilai 500W amplifier module (Photo 3), which is neatly laid out and constructed and is mounted on a large steel heat spreader, similar to the one used for the Hypex NCx500 power amplifier module. Perhaps because this is a consumer-facing module, the Nilai’s heat spreader is polished to a beautiful mirror finish. Some of the modules have a protective plastic film to protect the finish, so make sure this is removed before mounting the module.
On the rear panel, the power amps have balanced inputs exclusively and a switch to control the brightness of the front panel LED. They are finished in an attractive and unobtrusive black anodization and the case comprised two extruded side panels and plates for the front, rear, top, and bottom holding everything together. Hole placement was accurate making the assembly go very smoothly without forcing any of the screws.
Construction of the power amplifiers took me about an hour-and-a-half for the first unit, then slightly over an hour for the second. There are a few places where the work is a bit tight for the ham-handed, so if you’re of a certain age (ahem) some magnifying close-up glasses can be of help. I’ll admit that for the second amplifier, I left off one of the side pieces for assembly to allow me easier access to some of the board connectors, saving that side for last. This also made sliding the top plate in a bit easier.
A few parts are also mechanically tight including the front panel, which is mounted with a pair of blind screws. No doubt this contributed to the unit’s solid feel and lack of buzzing and rattling when driven hard. One other thing to note is that there are two separate circuit boards linked together that need to be broken apart — the instructions do not mention this.
The preamplifier took slightly longer to put together because of more I/O, fancier casework, and a front panel display, but the assembly was as simple and straightforward as the power amplifiers. One oddity was that on the back panel, one of the screw holes wasn’t countersunk, so I only have 15 screws instead of 16 holding the I/O board on the back panel.
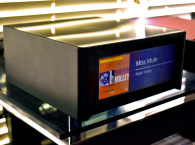
The Nilai preamp has two single-ended and one balanced input. At present, there’s no optical, USB, or coaxial digital inputs, but there is an expansion area that might accommodate these inputs in the future. There are two balanced outputs and both conventional (1/4” TRS) and “balanced” headphone outputs (Photo 4) — I use the scare quotes here because for whatever reason, the headphone world has co-opted the term “balanced” to mean “differential.”
The preamp includes a remote control, which is greatly appreciated (Photo 5). Now, I’ll confess that I prefer apps to remotes because of the clutter factor, but I recognize that I’m in the minority. At least this remote is relatively small and quite nicely laid out.
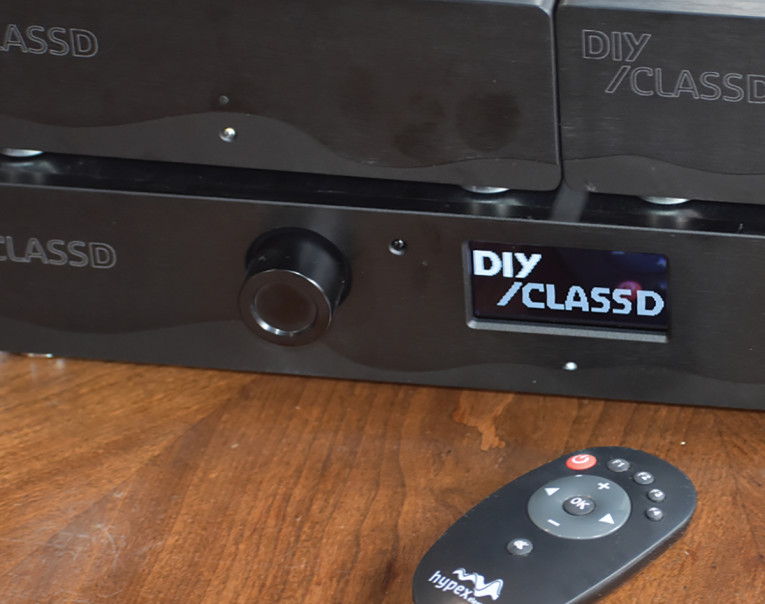
Volume control, balance, and source routing are done via rotary optical encoders rather than conventional potentiometers. This is a much cleaner way to do things and generally a plus for reliability. The controls allow easy scrolling though and item selection in the various option menus.
Once the products are assembled, you have some moderately small, visually attractive (in a minimalist way), and very solid and expensive feeling monoblock power amps, which can be stacked or hidden away, depending on your taste in decor for your listening room.
The preamplifier, of course, will be out and proud so that the controls and display can be accessed. What screams “2023” is that the preamp is considerably larger than the power amps.
The Nilais In Use
Initially, I just used the monoblock power amplifiers driven by the preamp outputs of an NAD M10 integrated amplifier to run the top section of my biamped speakers, a reworked version of the NHT 3.3 four-way dynamics. The bottom section was powered with a pair of Hypex NCx500 modules that I conveniently have not gotten around to returning (soon, guys, soon, I promise). I swapped them at the end just in case there were any audible differences.
My first reaction was panic — the amps wouldn’t power up! Despite the simple assembly and my experience with building electronics from scratch, did I make a silly error or somehow misinterpret the instructions? I frantically opened the amps up to trace the wiring (and frantic enough to drop one of them on my foot while trying to pry off the tightly fitting front panel — the resulting broken toe is a small sacrifice for science).
Everything seemed in order; after a bit of head scratching, I realized that, unlike other amplifiers I’ve used, the amps would not power up without a voltage present there. Although the trigger is nominally 12V, I didn’t have such a source close at hand, so I grabbed a 9V battery and a couple of TRS cables and crossed my fingers. Success! Of course, if you’re using these as part of a system with the Nilai preamplifier, the trigger voltage is provided and this kludge is unnecessary, although the user needs to run a 3.5mm TRS cable between the units.
I found out later that there is a way to power the amps on without the trigger. On the front panel, there is a small, unmarked button near the pilot light cleverly camouflaged to match the panel cover. It is, at least for my eyes and in less than glaring light, pretty difficult to see. Pressing that button allowed me to power the amp on and off without the trigger. I’d like to see this either in a contrasting color or with some sort of marking or indication.
My second problem was volume. Once the gain between top and bottom halves of my biamped system was set, I just couldn’t get my system to play loud enough. Clearly the Nilai amps required more voltage than the NAD’s preamp outputs were supplying. In a flash of inspiration, I did something uncharacteristic and actually read the manual. Aha! There are three jumper-selectable gain settings (11.8dB, 21.8dB, and 27.8dB) on the amplifier board, and the amp is shipped with the jumpers set for mid gain. One more disassembly, jumpers moved, and all was right with the world.
The Nilai amps were, unsurprisingly, absolutely dead silent, both electrically and mechanically. Pressing my ears right up to the speakers, I could not tell if the amps were on or off. I didn’t actually try to drive them into clipping, but they certainly never showed any signs of distress when cranked up with my favorite loud heavy metal.
More delightfully, after a full day of playing at a robust level, the amps were barely warm. In fact, after a day of use playing relatively quiet acoustic music, the amps were just about as warm. The efficiency cautions that Frank Veldman had given me made sense — there was far less difference in dissipation between the amps at idle versus going full tilt than is the usual, even for Class D.
I will confess that my use of the preamplifier was a bit more cursory. My primary music source is streaming, usually through the NAD M10, where the big attraction is Dirac Live. My alternative streaming source is a WiiM Pro, but that really functions best using its digital outputs, and at the point, optical or coaxial digital inputs are not available on the Nilai preamp (though the accessory plate does tease the future availability of this option). And of course, there’s still no Dirac, and I must admit that I’ve become addicted to the sonic magic that software brings.
So as a compromise, I inserted the Nilai preamp, set for 0dB gain, between the NAD and the Nilai power amps. The best thing a preamp can possibly do is nothing at all, other than switching sources and raising and lowering the volume. And that’s exactly what the Nilai did—nothing. No detectable tonal changes, distortion, or noise. Volume, balance, and source switching were noiseless, with no clicks, thumps, or scratches. There is absolutely nothing else one could ask of a preamp.
On the Bench
I pulled the Nilais out of my system (with some regret!) and set them up on my test bench next to an Audio Precision APx525 analyzer and a set of homemade high power dummy loads.
First up was the preamp. Most of the measurements were, frankly, boring. How so? I was so often just looking at the baseline noise and distortion of the audio analyzer. My default for measurement was unity (0dB) gain, but I confirmed that the preamp had a maximum gain of 13.1dB (about 4.5V/V).
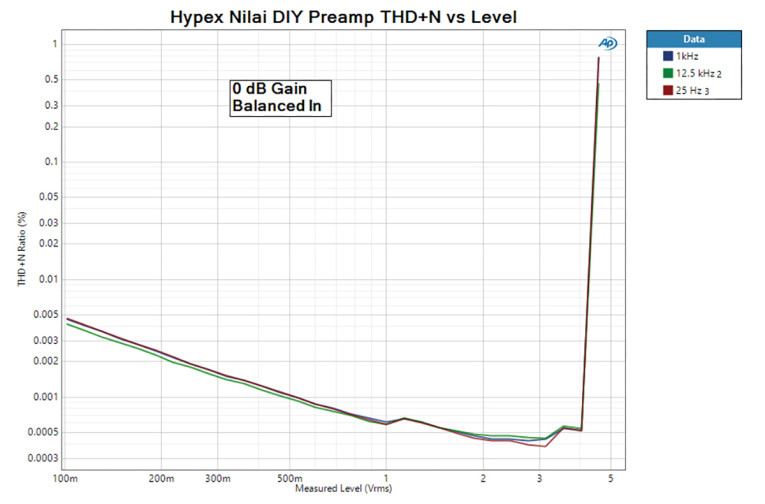
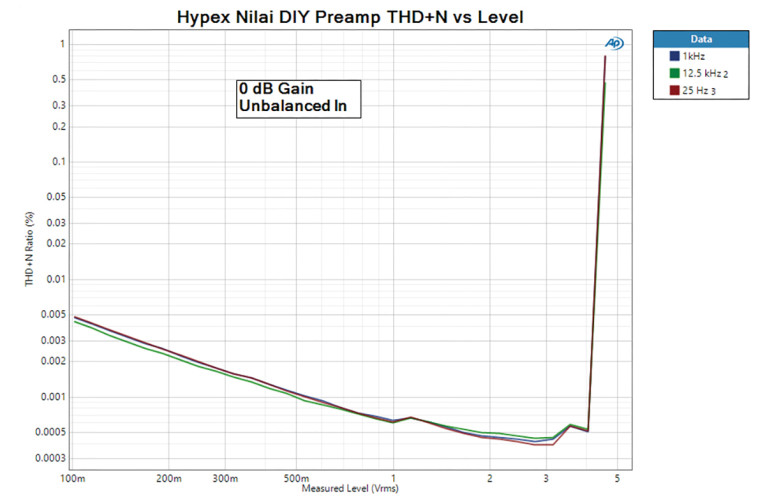
Figure 1 and Figure 2 show THD+N versus output level for three different frequencies (25Hz, 1kHz, and 12.5kHz) for the balanced and unbalanced inputs. respectively. The curves overlay one another nearly perfectly and are noise limited right up to the clipping point at slightly over 4V. This consistency is very unusual in feedback designs, where the distortion starts deteriorating at high frequencies as the open loop gain, and hence feedback, decreases. And of course, the distortion is down at my measurement residual, so I may be reporting ridiculously small numbers that are still too large. The 4V limit is above what most power amps require to reach full output. This is very impressive engineering.
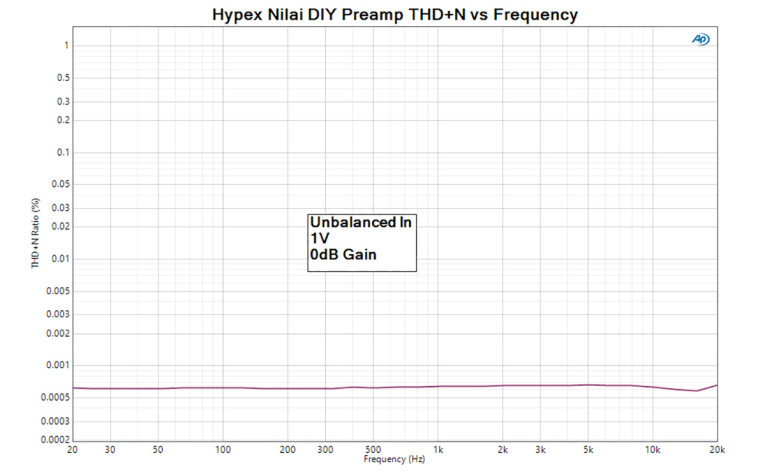
Not surprisingly, when we plot THD+N versus frequency for a 2.5V output level for the balanced and unbalanced inputs (Figure 3 and Figure 4, respectively), the curves are at a very low level and basically flat.

One of the compelling reasons (if not THE compelling reason) to used balanced connections is to reject common mode noise. The comparative output at 1V drive with gain set at 0dB with normal (differential) mode and common mode is shown in Figure 5. The common mode rejection is about 85dB throughout most of the audio band and falling slightly to 77dB at 20kHz. This is very good performance, bespeaking an input topology resembling a high-quality instrumentation amplifier.

This preamplifier achieves the goal of doing essentially nothing to the input signal other than routing and amplifying.
Turning to the power amplifier, my measurements were all made with the gain set to the factory-supplied default jumper setting, which yielded a gain of 21.7dB.
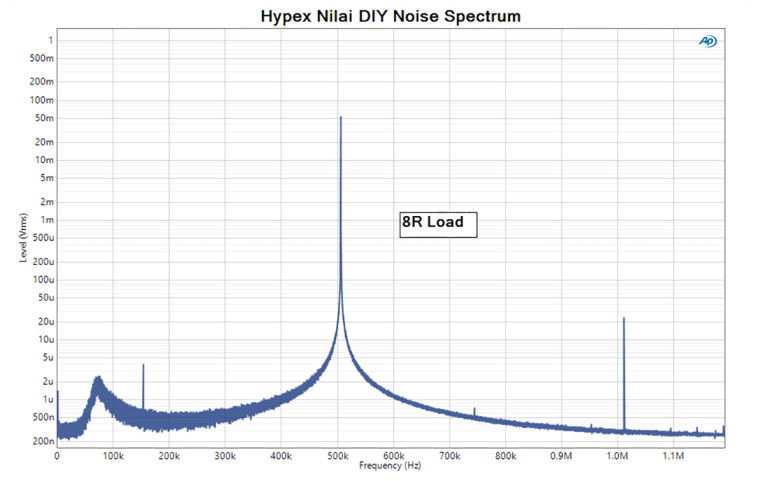
I first hooked up an 8R dummy load and measured the noise spectrum at no signal in. This is shown in Figure 6. The effect of having a second order output filter is clear—to date, all of the self-oscillating Class-D amps I have tested have a residual of several hundred millivolts of the oscillation frequency on the output. As you can see, the oscillator leakage is only 50mV and the overall noise floor is exceptionally low, correlating with my sonic observations.
The main job of a power amplifier is to deliver power, so I ran distortion versus power curves with both 8R and 4R dummy loads (Figure 7 and Figure 8, respectively). Each plot shows data taken at 25Hz, 1kHz, and 12.5kHz. For the 4R load, the power at 1% distortion exceeds 500W; the corresponding data for 8R shows the 1% distortion at about 280W. The 25Hz and 1kHz data track one another reasonably well. The 12.5kHz curves show some odd behavior at medium power with higher distortion. To put that in perspective, the elevated distortion is still only 0.005% or so, what would have been state of the art a couple years ago. And of course, the harmonics of those frequencies lie well outside of human audible limits, so this is of minimal concern.
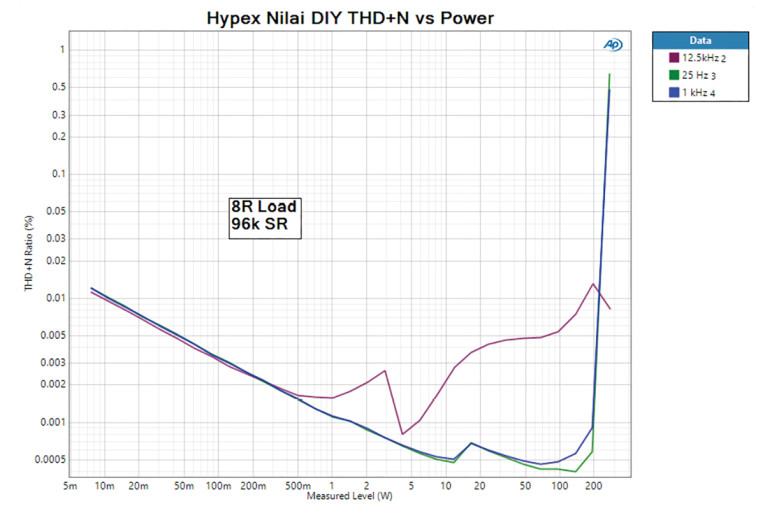
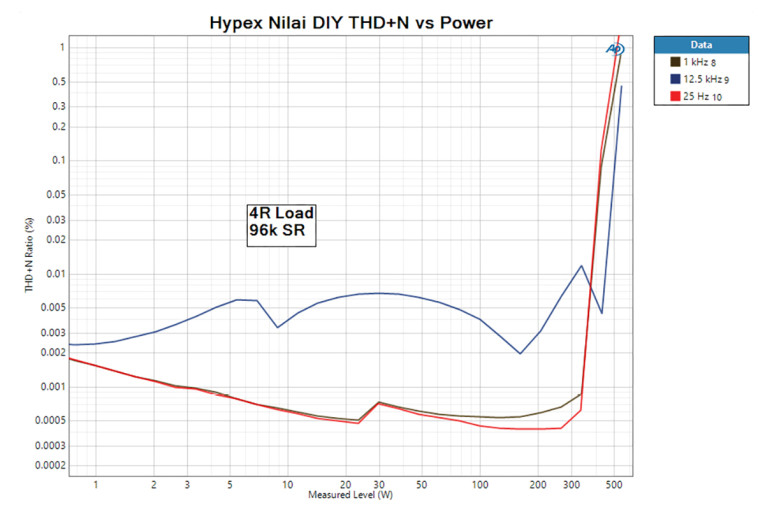
Figure 9 shows the distortion spectrum at 5kHz with an 8R load at 100W. The low noise means that the distortion spikes are easy to resolve — but look at the levels! It is a challenge to measure distortion this low. Sweeping distortion versus frequency yields the curves shown in Figure 10, which were taken using an 8R load with 2.83V (1W) and 29.1V (about 106W) drive. There is some rise at higher frequencies (with the 48kHz sample rate used, harmonics above 24kHz are suppressed), but again, the levels are crazy low.


There’s been some rumbling on the Internet that Hypex amplifiers do not react well to capacitive loads. This struck me as quite curious. To explore these claims, I first ran a frequency response sweep with an 8R load, then for comparison, the same load with a 2µF capacitor shunting it, which is a truly horrific load, well exceeding the capacitance presented by a typical electrostatic loudspeaker. The results are shown in Figure 11.
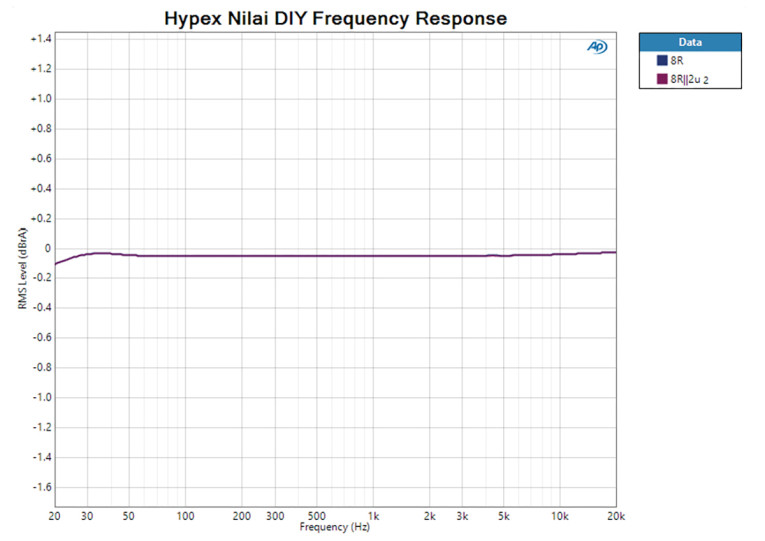
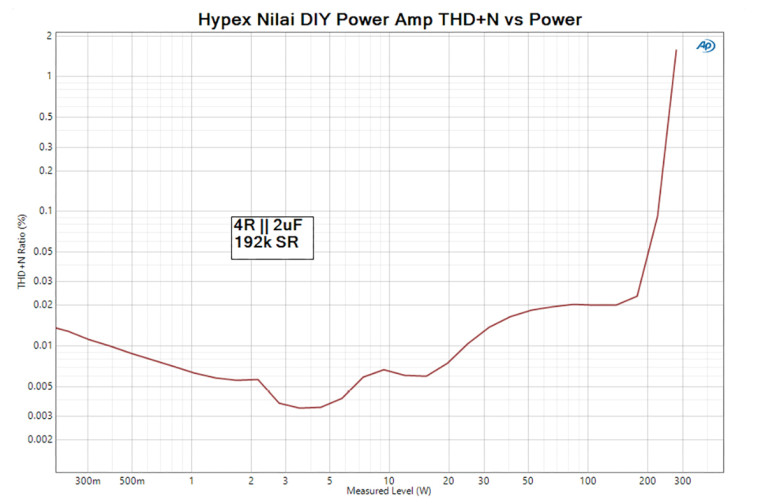
If there’s any problem there, I sure can’t find it. Just to be certain, I ran a power sweep using a dummy load of 4R in parallel with 4µF (Figure 12). Note that the power on the X-axis is not going to be an accurate measure of actual power delivered since the APx software calculates it based on the measured voltage across a pure 4R reference. Nonetheless, there is nothing untoward in the data. Despite the rumors, this appears to be a total non-issue, but it is a very nice demonstration of the Nilai’s exceptionally good load tolerance.
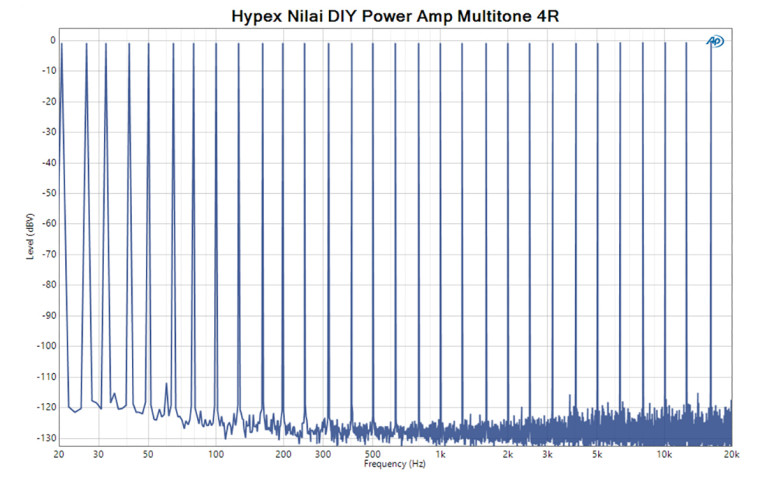
Continuing, I ran a multitone measurement with a 4R load. Each component was at a 1V level. The results are shown in Figure 13; unsurprisingly, the spectrum is almost perfectly clean with no distortion or noise components rising above -110dBV (3µV) and most lying below -120dBV.
Finally, I also measured the common mode rejection (CMR) at the inputs (Figure 14). At hum frequencies, the CMR was better than 105dB, deteriorating to “only” 65dB in the top octave. This demonstrates superb balance and noise rejection. The amplifier’s output impedance was lower than my measurement limit (0.02Ω), which goes a long way toward making this amp truly load invariant. These measurements are absolutely exemplary.

Conclusions
The electronics under test here delivered the goods, noiselessly, efficiently, and with tons of power. I have some quibbles, but not with the performance — the measured results are absolutely outstanding. I think that in 2023, any preamp should have digital and USB inputs. I really wish that the power amp power switch was more visible. And... well... that’s about it.
Hypex continues to bring out superb products showing smart engineering. When they claim “load independent,” they’re not kidding. The amplifiers handled everything I threw at them flawlessly including torturous reactive loads. The preamplifier matched the amp’s performance and added a very user friendly (and likely highly reliable) user interface. The Nilai line is killer good. Highly recommended.
Resources
“DIY Class D Preamplifier User Manual,” Hypex BV,
www.diyclassd.com/DIY_PreAmplifier_User_GuideR01.pdf
J. Martins, “Hypex Presents New Nilai500 DIY Audio Amplifier Module,” audioXpress, May 16, 2022,
“Nilai 500 DIY Mono Kit,” Hypex BV,
www.diyclassd.com/media/4f/27/39/1678454104/Nilai500DIY%20Mono-kit_User%20Instructions_R1.pdf
S. Yaniger, “The Hypex NCore NCx500 Amplifier Module: Doubling Down on a Flagship,” audioXpress, May 2023.
This article was originally published in audioXpress, July 2023