I will confess to being a measurement geek. I firmly believe that anything you can hear, you can measure. The challenges lay in choosing appropriate measurements, properly performing them, and making reasonable interpretations.
A Bit of History
The basic measurements in audio electronics are voltage, current, impedance, noise, power, and distortion. Many years ago, when I was young and dinosaurs roamed the earth, the basic tools for these audio measurements were voltmeters, sine and square wave signal generators, and oscilloscopes. If your test bench was particularly well equipped, you might have a distortion meter (or two since the measurement of harmonic distortion and intermodulation distortion usually required separate instruments) and a test microphone. With those simple tools, audio amateurs performed all the basic measurements needed to construct the relatively unsophisticated circuits of the day. The measurement process was slow, tedious, and often uncertain.
Professionals used a few more advanced tools (e.g., impedance bridges, spectrum analyzers, and wave analyzers), but for the amateur, these were hideously expensive. For example, the Nicolet spectrum analyzer I used as a whippersnapper (state-of-the-art for its time) would sell for more than $200,000 in today’s currency. It also outweighed me, so it was not the most convenient instrument to use. At the expense of adding a lot of tedium and time to the measurement of frequency spectra, you could use a somewhat less expensive and much less bulky wave analyzer (e.g., the Hewlett-Packard 3581A), but it still carried a rather prohibitive cost. Typically, we could only view the tools of professionals with burning envy.
Likewise, speaker measurements were done with swept sine waves or (if you were particularly cool) warble tones, point-by-point, graphed by hand. These manual methods suffered from the need to improvise an anechoic chamber (and it was rarely satisfactorily done). High noise levels, and again, time and tedium were major impediments.
Commercial breakthroughs such as Crown’s Tecron Time Delay Spectrometry (TDS) analyzer or the use of multiplex and impulse techniques were a blessing for professionals, but again, cost was a deterrent for most amateurs. With the advent and evolution of the personal computer (PC), a revolution took place. One of the first shots fired was Bill Waslo’s innovative IMP audio analyzer—about 20 years ago. The IMP was a sophisticated speaker testing system that could test loudspeaker frequency response and complex impedance using impulse response (later upgraded to MLS), and connected to a PC via the printer port.
Recognizing that sophisticated signal processing power was now available on inexpensive chips and that much of the cost and bulk of professional spectrum analyzers was the user input interface and display, the IMP cleverly took advantage of the early PCs’ newly available graphics and input capabilities to provide a remarkably sophisticated tool for amateur speaker builders. (In this context, I have used PC in the general sense, not limited to specific brands or operating systems, though in this case, the IMP was only compatible with IBM-type computers running DOS.)
When I first saw Waslo’s article, “The IMP Audio Analyzer,” I literally ran to the mailbox to send off a check for the kit. Finally, some of the incredible capabilities I had at work for scientific measurements could be available to me at home for my audio hobby! And, I wasn’t disappointed. The unit greatly increased my measurement capabilities. On a commercial level, data acquisition systems (attachments to the computer that converted analog measurements into data accessible by the computer’s CPU for calculation and display) started to become widely available to the professional community, but they were expensive and required some sophisticated user skills in programming them to get usable measurement results.
Although the audio amateur and semiprofessional electronic design and construction market for test equipment is miniscule, we can often leverage technology from other, larger markets. The next step in the revolution was the widespread introduction of sound cards to PCs, which targeted computer gamers. The sound cards interfaced the computer with playback transducers (headphones and loudspeakers) and microphones.
Some clever people recognized that the sound cards were, in essence, data acquisition systems themselves. They could take analog data and convert them to computer-readable files or take computer readable files and convert them to analog outputs. The development and refinement of the appropriate software and hardware has vaulted amateur measurement capabilities into arenas formerly the exclusive domain of the pros, and inadvertently, pushed professional audio equipment manufacturers to seek new performance levels, measurement capability, and user-friendliness.
Computer-aided measurement s can, unfortunately, be an efficient way of quickly amassing huge amounts of nonsense, so I’ll also try to warn you away from the more common pitfalls so that your measurements are more likely to be meaningful.
Hardware Basics
There are several “flavors” of sound cards out there (Sound cards intended for the music recording market are usually called “audio interfaces,” so don’t let my use of “sound card” limit you).
Built-In Sound Cards: Most modern computers come with built-in sound capability, generally using on-board chipsets. In my experience, the performance of these systems has been mediocre, but it’s easy and quick to check. One problem with a built-in solution is that often the only accessible analog input is a microphone level input that might even be mono, which is the case for the Lenovo laptop I used to write this article. You’ll need a line-level input to really get the most out of your built-in sound card. If that’s available, a few minutes doing a loopback test (i.e., connecting output to input) with something such as the RightMark Audio Analyzer (which we’ll discuss when we get to software options) will determine if your equipment has sufficiently low distortion and noise or whether you’ll have to purchase an aftermarket solution.
Note that for loudspeaker measurements, the sound card performance can be quite a bit worse than for electronics measurements without messing things up. That’s because loudspeakers tend to have significantly higher distortion than electronics, and generally, we’re not looking at very low level signals. So if your primary interest is loudspeaker frequency response measurements, the built-in sound card in a laptop is likely good enough. However, it will still require an external amplifier, a test mike, and most likely a mike preamp.
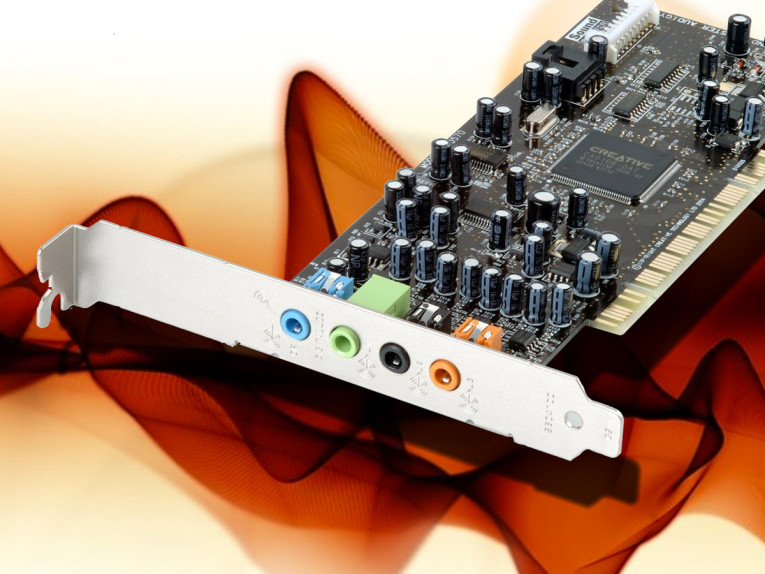
PCI Sound Cards: A major step up is a high performance aftermarket card that plugs into the PCI slot of a desktop computer. It is often asserted that plunging the sound card into the depths of a computer is a sure-fire recipe for noise pickup. Maybe so, but I’ve used two different PCI sound cards in five different computers and only had one issue with noise among all those combinations. My experience may not be universal, though, so see if you can buy on a return basis. The main market for the PCI format is music composition and gaming, so there’s a wide range of available performance and pricing. 192-kHz sample rates are widely available.
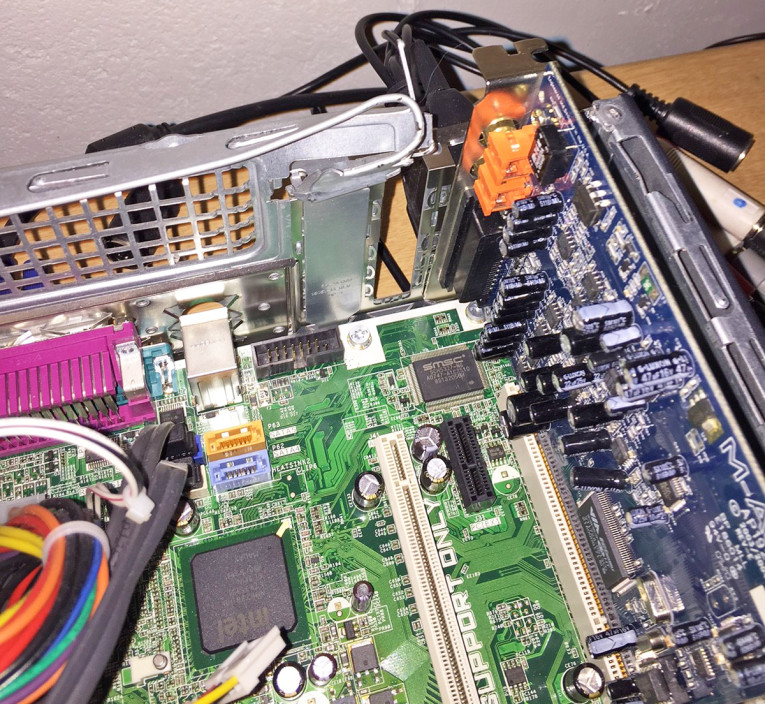
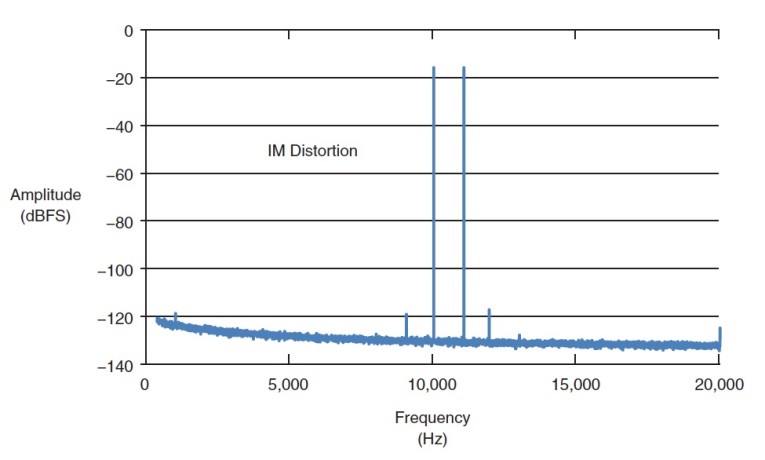
Professional Tip: Do not buy a low-profile computer if you’re planning to fit a normal-sized PCI sound card into it. Otherwise, your setup may look like mine (see Photo 1). Despite the horrible appearance, this actually worked pretty well. As an example, Figure 1 shows the intermodulation performance of a prototype phono stage with the spectrum acquired via the sound card. Note the nice quiet noise floor. The new PCI Express (PCIe) cards are suitably low profile and will obviate the need for the sort of radical surgery I had to perform.
External Sound Cards: Most of these are made for musicians and bedroom recording. That means they’re mass produced at a relatively low cost. Putting aside audiophile snobbery, this is not a bug, it’s a feature. Communication with the computer is most commonly through the USB port, though there’s a few Firewire and Thunderbolt interfaces out there.
The potential upside of going external is removing the sound card’s potential of noise contamination from being inside the computer case. There’s also superior portability, since you’re not tied down to a desktop machine as you are with PCI interfaces. The downside is potential noise and ground-loops from USB or Firewire power. Because of the intended market for external sound cards (amateur recording) and communications speed limitations with USB and USB 2.0, they are overwhelmingly available only with 48-kHz and 96-kHz sample rates (which I will discuss in greater detail later). However, we’re starting to see some nice hardware with higher sample-rate capabilities starting to come down in price.
 Article Series Overview
In coming months, I’ll provide an overview of some of the hardware and software options. Following that, we will consider what external hardware it takes to translate that into a useful instrument. Along the way, I will provide some examples of actual measurements and what it took to obtain them. I’ll also discuss ways to design and build your own simple interfaces and jigs to do common measurements.
In addition, I’ll review some specific pieces of commercially available software and hardware so you can get a good idea of the trade-offs and choose what’s most appropriate for the measurements you want to do. Finally, we’ll consider some advanced issues in measurement and how they can impact your results and the way the data are presented. Next month: Choosing a sound card and some computer tips.
Resources
H. Biering, “Measurement of Loudspeaker and Microphone Performance Using
Dual-Channel FFT Analysis,” Application note for the Brüel & Kjær 2032, 1984.
B. Waslo, “The IMP Analyzer,” Speaker Builder, January–April 1993.
———, “The IMP Goes MLS,” Speaker Builder, June 1993.
Read Part 2 of the series
Read Part 3 of the series
Read Part 4 of the series
Read Part 5 of the series
Read Part 6 of the series
Read Part 7 of the series
Read more articles by Stuart Yaniger
This article was originally published in audioXpress, June 2015.