Every day I visit audio web forums and Facebook groups to offer help and guidance. And every day I see people proudly posting photos of their setups, hoping for an atta-boy from their online friends. Unfortunately, almost every system I see is poorly set up. One common problem is a lack of symmetry, with the left speaker next to a wall while the right side is 10’ from the other wall. This pulls the sound toward the side with the wall, because reflections from the wall make that side louder. The reflections also skew the frequency response on only that side.
Other poor setups have the tweeters higher or lower than ear height, which also skews the response, or the listening seat has a leather or plastic back that extends above their ears. But the problem I see most often is a lack of acoustic treatment. Most people have no idea how badly their room damages the sound because they never measured their room’s frequency response and other properties. Poor acoustics is the elephant in the room, and most people don’t even know it. Measuring can also highlight other ills, such as excess ambience, early reflections, and modal ringing—extended decay times at specific bass frequencies related to the room’s dimensions.
Why We Measure
One reason to measure your room is to find the best locations for your speakers and listening seat. I use the Room EQ Wizard program (REW), which can measure every aspect of a room’s acoustics in about 10 seconds. Even better, REW is “donationware” and the full version can be downloaded for free. You put a measuring microphone where your head would be while listening, measure, move, and measure again. I’ve seen audiophiles experiment for years with speaker placement going by ear alone. With REW you can confirm the best locations in an afternoon.
One important reason programs such as REW are better than going by ear is that REW measures all frequencies. Trying to tweak your setup by playing music is doomed to failure because music contains mostly specific frequencies—those related to the key of the current music. A speaker placement that sounds good for music in the key of A might sound full because 55Hz is emphasized at the listener’s seat. But that same location might have a deep null at 65Hz making a track in the key of C sound thin and weak. Measuring shows all frequencies at once, ensuring that for a given location no frequencies are excessively raised or reduced at the expense of other frequencies.
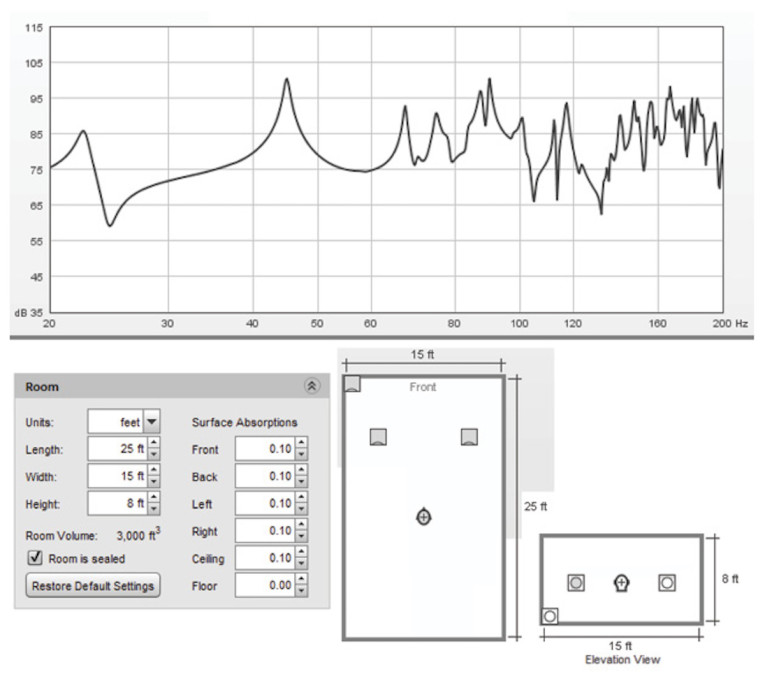
REW also includes a fabulous Room Simulation module that shows the listener response vs. speaker locations. You place a virtual head where you sit while listening, then move the speakers and head to find the flattest response. The Room Simulation also accommodates up to four subwoofers, though the screen capture in Figure 1 shows only one subwoofer in the front left corner. This is a lot easier than actually moving things around and measuring dozens of times. Of course, measuring is still needed to confirm, and the Room Simulation should be considered more of a starting point than the final arbiter.
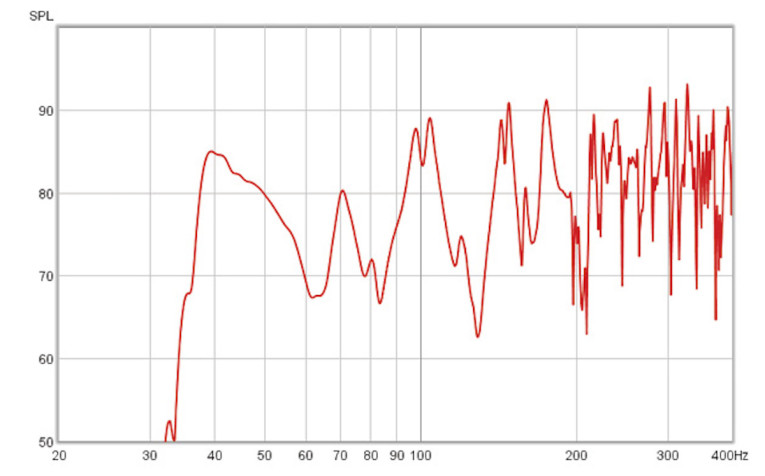
Measuring is also useful to assess the improvement after adding bass traps and other acoustic treatments. Not that the improvement isn’t audibly obvious! But you can quickly find the best location for bass traps by measuring the response as you experiment with their placement. Bass waves get to every nook and cranny in a room, depending on the frequency, speaker location, and other factors. Further, low frequencies are the most difficult to control. They’re greatly affected by speaker and listener position, and require large thick absorbers to tame. Again, you measure, move, then measure again until you’re satisfied that you achieved the best response at frequencies below 200Hz to 300Hz. Figure 2 shows the response I measured in the small “lab” room at my company’s factory. This response is absolutely typical of all untreated home-size rooms. Pretty awful isn’t it!
Besides showing the frequency response at your ears, REW can also show the arrival time and strength of individual reflections. If REW shows a strong reflection arriving 6ms after the direct sound, you can determine from which surface that reflection is coming. Sound travels at 1.1’ per millisecond, so an arrival delay of 6ms means the reflected sound traveled about 6’ farther than the direct sound from the speaker. Once you know where the reflection comes from, that’s where an acoustic absorbing panel should be placed. As proven in Figure 3, measuring also shows that speakers give a flatter response when toed in to point at you rather than aiming straight ahead. With most speakers the same problem occurs vertically, so the tweeters should always be at ear height too.

However, contrary to popular belief, measuring isn’t really needed to know how to treat a room. I’ve measured hundreds of rooms, and the starting strategy is always the same: bass traps in the four wall-to-wall corners, absorbers at the side-wall reflection areas, and either absorption or diffusion on the rear wall behind the listener(s). Rectangular rooms have 12 corners, not just four where two walls meet. So wall-ceiling corners, and even wall-floor corners, are equally useful for bass traps. The front wall is another good location for bass traps, and ceiling reflections also benefit from absorption if the ceiling is 8’ or lower. Note that good diffusion costs more than good absorption, whether you buy commercial products or build your own. So your budget is the main determinant for which you choose for the rear wall.
How It Works
Measuring software plays a sine wave “sweep” over the current range of interest. You can set the sweep to focus on just the bass range, or any span of frequencies. A single sweep is all that’s needed to assess every acoustic property of the room. It’s important to measure three times initially: the left speaker alone, the right speaker alone, then both speakers playing together. Mix engineers usually set bass instruments to play through both speakers equally to center them in the stereo field. This is done for several reasons. One reason is to share the load equally with the left and right speakers. In most music recordings, low frequencies contain much more energy than the rest of the range. By sharing the load with both speakers, your system can play louder and with less distortion. Another reason is bass frequencies must be in mono for vinyl records to prevent the needle from jumping out of the groove at loud volumes. So it’s important to measure both speakers together when assessing the low frequency response because that’s what happens when playing music.
But it’s also useful to measure the left and right speakers separately to reveal problems with the speakers themselves, or to expose asymmetry in the room. For example, if a capacitor in one speaker’s crossover is out of tolerance, you might not notice because any frequencies missing will be present in the other speaker and still be heard. Those frequencies would also register in a measurement with both speakers playing. Most measurements are made with the microphone where your head would be while listening, but to verify speakers you’ll measure each separately from 1’ away with the microphone aimed at the tweeter.
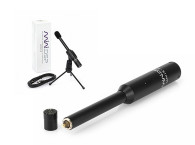
In order to measure speakers or a room, you need a suitable microphone. The correct type is a small diaphragm omnidirectional condenser, and these range in price from around $50 up to $1,000 or more. Professional acousticians require absolute accuracy, so they favor high-end models from companies such as Earthworks, Bruel & Kjaer, and DPA. I use a DPA 4090, which costs around $650, though some pro models cost much more. But for home use what matters most is relative measurements: By how much did that null come up after adding corner bass traps, or after moving the speakers forward 6”? Further, as my Microphone Comparison article shows, even inexpensive microphones of the correct type are accurate at low frequencies where measuring is most needed.
One popular affordable measuring microphone is the Behringer ECM8000, which sells for around $60. This model is meant mainly for recording studios, and it requires a preamp that can provide 48V “phantom power” that’s standard for such mics. So for home users I often recommend the Dayton Audio UMM-6 USB microphone. This model works with any Windows or Mac computer and doesn’t require a separate preamplifier. You simply plug it into an available USB port on a desktop or laptop computer, and it shows up as an input source in audio recording software, including Room EQ Wizard.
Omnidirectional microphones are designed to pick up sound equally from every direction, but in practice even the best ones favor sound coming from the front at least a little. As a general rule, the smaller the microphone and its capsule, the less it misses sounds coming from the sides or rear, especially at high frequencies. So to verify a loudspeaker’s response when measuring close up you’ll aim the mic directly at the tweeter. But when measuring a room with both speakers playing, you should aim the microphone straight ahead to a point between the speakers, with the mic at the same height as the tweeters and your head. When balancing levels in a surround system to ensure that all speakers play at the same volume, the microphone should instead be pointed straight up toward the ceiling. This ensures that the same response is received from all of the speakers, even if high frequencies are reduced some by being off-axis and striking the side of the mic.
One last point worth mentioning is microphone calibration files. All microphones include generic specs that show their expected frequency response, though expensive microphones usually include a response graph measured for that specific unit. Room EQ Wizard can import a data file containing a microphone’s specific response, which it applies to the graphs it displays. So if your microphone has a 2dB dip around 1kHz, REW applies a countering boost. There are several companies that will measure your microphone for less than $100, then return it with a file suitable for importing into REW. (Google “microphone calibration service” to find one in your country.) I never bother with calibration files because my DPA 4090 is very flat. And as I said earlier, what matters most when measuring rooms is relative changes. Further, decay times are independent of frequency response, so those graphs are as accurate as the measuring software.
What We Measure
Measuring the frequency response at your listening seat shows the combined response of the speakers plus the influence from your room. Most speakers are reasonably flat within their operating range, falling off at the high and low extremes. But rooms create numerous peaks and dips spanning 20dB to 30dB or even more throughout the entire frequency range, as is evident in Figure 2 and Figure 4. When measuring low frequencies below 200Hz or 300Hz, it’s important to disable smoothing, also called averaging. This way you can see the true extent of the peaks and nulls. But phantom peaks and nulls that don’t really exist can show up at mid and high frequencies caused by different arrival times from the left and right speakers.
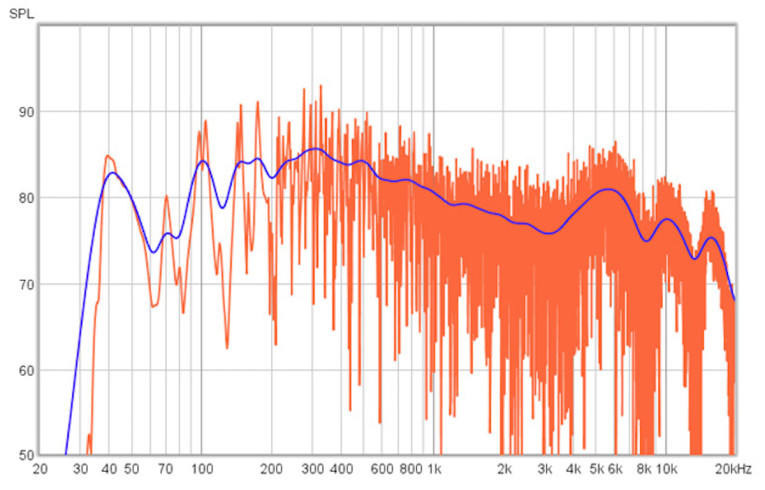
Unless the measuring microphone is precisely the same distance from both the left and right speakers, sound from one speaker will arrive slightly sooner than sound from the other speaker. Imagine you’re playing a single frequency sine wave of 2kHz from both speakers. If the microphone is 4” closer to one speaker than to the other, which is about half a wavelength, one wave will be rising while the other is falling. So when the sounds combine in the air at the microphone they cancel each other creating a dip in the response. The solution is to “smooth” the data by averaging the response at nearby frequencies. A deep null at 2,000Hz is probably not present at 1,900Hz or 2,100Hz.
Figure 4 shows the same measurement two ways: the raw response in red, plus the smoothed response in blue. In this graph the smoothed response is averaged at one-third octave resolution. This means that all of the frequencies within each one-third of an octave are averaged together and treated as a single data point. (One octave spans a frequency range of two-to-one, or a doubling or halving of frequency.) You can see that at frequencies below 200Hz smoothing hides the true response, lowering the peaks and raising the nulls. But at higher frequencies the peaks and nulls are so close together, and so extreme, that smoothing is needed to see the forest for the trees, so to speak.
Note that some of these peaks and nulls are caused by reflections, not different arrival times, so those are real and benefit from applying absorption on the reflecting surfaces. But the response in a room is so highly positional that a null in one ear is not likely to be present in your other ear, so those null frequencies are not fully absent and are still heard. Just moving your head 1” or 2” can change the response dramatically at both ears, which also brings back frequencies that had cancelled. So averaging is useful and not dishonest at higher frequencies.
Frequency response is arguably the most important property of a listening room. In my 2017 article “Practical Applications for SPL Meters,” I introduced the concept of measuring the acoustic properties of a room, and showed that the main aspect of sound quality people notice is frequency content.
The basic tonality of a recording or playback system has the most influence on things (e.g., harsh treble and thin or boomy bass). But decay time vs. frequency matters nearly as much. If the decay times are longer at only some frequencies, those frequencies will linger longer and have more energy, and therefore sound louder even though a static response graph might appear to be flat.
Figure 5 shows the RT60 reverb decay times in my company’s 16’ × 11.5’ test room mentioned earlier, first when empty, then again when fully treated with absorption and diffusion. RT60 defines how long it takes after a sound source stops for the reverberant remainder to decay by 60dB.
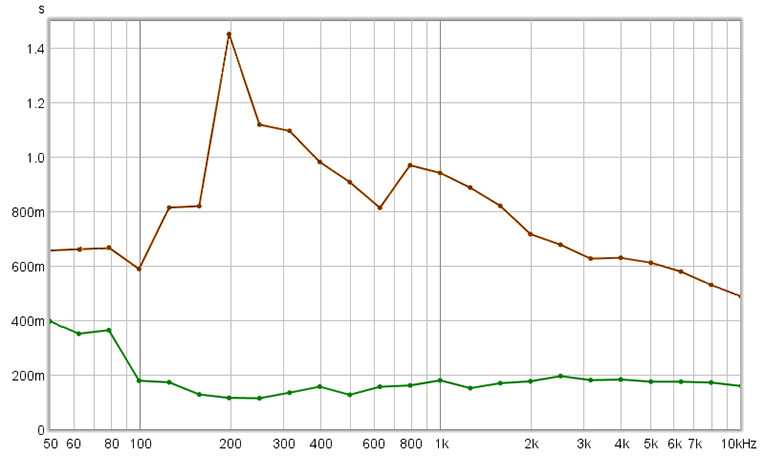
Most domestic rooms have too much background noise to measure a span as large as 60dB. So room measuring software instead measures just the first 20dB or 30dB, then extrapolates the rest. Decay times are linear, so an RT30 that measures half a second means the RT60 will be one second.
The reverb measured in home-size rooms is not true reverb as occurs in larger spaces (e.g., gymnasiums and auditoriums). In large spaces reverb initially grows as reflected sounds bounce repeatedly off far-away surfaces, then decays over time. In smaller rooms, reflections from nearby surfaces arrive quickly at full intensity, then decay. But the same RT60 metric is used for small rooms, and the measurements are still useful. In audio rooms, the goal is uniform decay times at all frequencies, though a rise at low frequencies is common and acceptable in both homes and auditoriums.
Just as frequency response is displayed with or without smoothing for high and low frequencies, decay times also require two different views. The RT60 display shown in Figure 5 gives a general reading for the main range of audible frequencies. It’s easy see that the overall decay times are way too long for a listening room at 0.6 seconds and up, and the decay times around 200Hz to 300Hz stick out like a sore thumb. However, a different metric is used for low frequencies, to assess modal ringing (also called modal resonance).
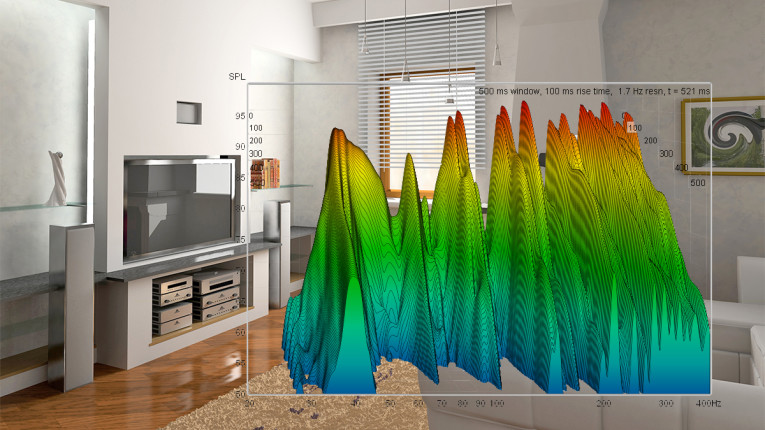
Modal ringing occurs at specific frequencies (mode frequencies) related to the room’s dimensions, and it manifests as both a peak in the response and an extended decay time at each resonant frequency. For this view of room acoustics we use the waterfall plots shown in Figure 6. In this type of graph the “mountains” come forward over time as each response peak decays, with the upper left and right of the graph noting the number of milliseconds. The large reduction in decay times after adding bass traps and other treatment makes an equally large improvement in low frequency clarity by avoiding a clash between overlapping bass notes.

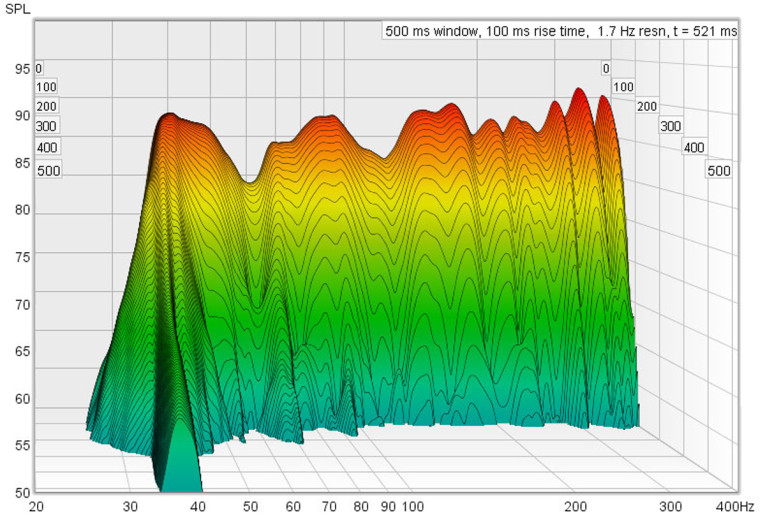
Figure 6: These graphs show waterfalls plots, again with the same small room empty (a); then after adding a full complement of bass traps and other treatment (b). These graphs are derived from the same single sweep as the other figures.
Under Resources is a link to a video showing how the measurements in this article were made. The video also lets you hear how much the sound improved after adding acoustic treatment.
Final Thoughts
Finally, I’ll mention a few other Room EQ Wizard features that are worth exploring on your own. Where a waterfall plot shows the combined amplitude and decay time of single resonances, the spectrogram shows decay times independent of level. I’ve used this display type to prove that room EQ products can’t reduce decay times as is often claimed.
Another useful view is Clarity, which shows the ratio between “early” and “late” sound arrival as it affects either speech or music. Two Impulse graph types show the arrival time of individual reflections from the walls, floor, and ceiling. REW can even display the distortion of your system. It can’t distinguish the source of distortion, but loudspeakers are always the worst culprit. I used this REW feature in my article “Stop Worrying About Coupling Capacitors!” that was published in the May, 2020 issue of audioXpress. aX
This article was originally published in audioXpress, August 2021.
Resources
E. Winer, ”Ten Omni Microphones Compared,” RealTraps,
http://realtraps.com/art_microphones.htm
E. Winer, “Stop Worrying About Coupling Capacitors!,” audioXpress, May 2020,
E. Winer, “Practical Applications for SPL Meters,” audioXpress, March 2015.
E. Winer, “Assessing Room EQ,” http://ethanwiner.com/dirac/dirac.htm
“Hearing is Believing—The Ultimate Small Mixing & Mastering Room,” YouTube, www.youtube.com/watch?v=dB8H0HFMylo
Sources
Dayton Audio UMM-6 USB Microphone
Parts Express |
www.parts-express.com/Dayton-Audio-UMM-6-USB-Measurement-Microphone-390-808
Room EQ Wizard
John Mulcahy | www.roomeqwizard.com
Ethan Winer website | ethanwiner.com
RealTraps | http://realtraps.com