The Concept
The whole idea is to make a sub as small as possible and still have a low, non-resonant bass. Quarter-wave—transmission line—does have a deep and clean bass. The challenge is to tune the pipe to a low frequency using a relatively small cabinet.
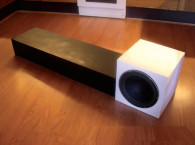
Hideaway has a coupling chamber, which is the only visible part of the cabinet. The pipe itself is hidden under the couch. The opening is close to the driver, and both driver and opening are at floor level. This will increase the bass due to room gain. Furthermore, the sound from the driver and the opening should behave as one point of source.
Update
I was going to build one more sub, which needed to fit under my new couch with only 15cm of free space. This called for changing the geometry of the first Hideaway. Because I would place the sub in a corner, I needed to watch out for peaks and the risk of boomy one-tone bass caused by room gain.
I wanted a modern driver, and as a Dane, Peerless was, of course, my first choice. So I chose the Peerless 10˝ SLS 830668, which has a nice price tag and very useful data: Fs is 33.3Hz, Vas 69.3 liters, and Qts 0.51. All driver data is available at www.tymphany.com. The Fs is a little high, but the high Qts allows for tuning the cabinet well below driver Fs.
The tuning frequency is based on length and geometry, and by using Martin J. King’s software, I was able to design the cabinet with a low tuning frequency without ending up with a large cabinet. Photo 1 shows the result of my latest efforts.

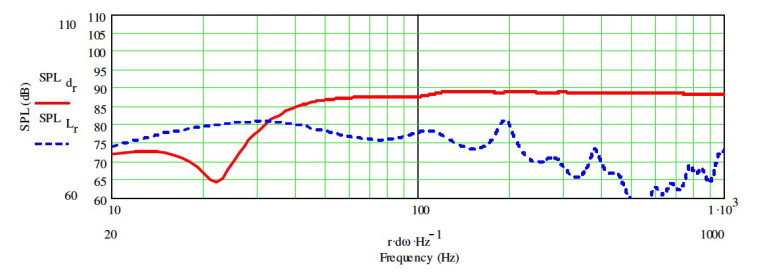
In Fig. 1 you can see that the rolloff is gentle, and the lift caused by room gain will compensate for the rolloff. The peak around 200Hz can be ignored. This is a sub, and crossover will be lower than 200Hz.
Please note there are no peaks at all in the bass, and in Fig. 2 you can see why: The output from the opening is very broad and very flat. This is caused by the geometry and the fact that the cabinet’s tuning frequency is “far away” from the driver Fs at 33Hz. The tuning frequency of the cabinet alone is 22Hz.
The cone excursion is very well damped down to 20Hz. Because I was using the Hypex sub amp with subsonic filter, the total design looked very promising. I designed the unit on the computer to meet my goals. Now I just had to build it. The cabinet contains 12 pieces.

narrowed down as a form of tapering.
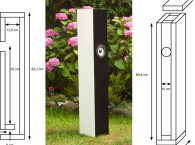
The enclosure has a loading chamber, which is the visible part of the cabinet. The pipe itself is “attached” and can be hidden under the couch. As you can see in Fig. 3, the pipe is folded and the last part has a smaller cross-section, a kind of taper. This geometry is, I have found, very good for damping the upper unwanted harmonic resonances and allows for a low tuning frequency of the cabinet with a relatively small footprint.
This design is limited by the volume. More volume equals more bass, but because the sub should be as “invisible” as possible, I think the result is a very good compromise. Figure 4 shows the sub from the front with the opening next to the driver. With this configuration, the sound does not change much when you walk around the room.
Construction
I used 9mm MDF for the cabinet. You might be shocked, but I was limited by the lack of space. In the chamber I glued extra 9mm MDF on all sides and placed a cross bracket inside. The front baffle is 22mm MDF. The result is better than expected, with not many vibrations from the cabinet. The internal height is 30cm in the chamber and 13cm in the pipe. The opening is 9cm wide and 13cm high. The footprint is 35cm × 130cm.
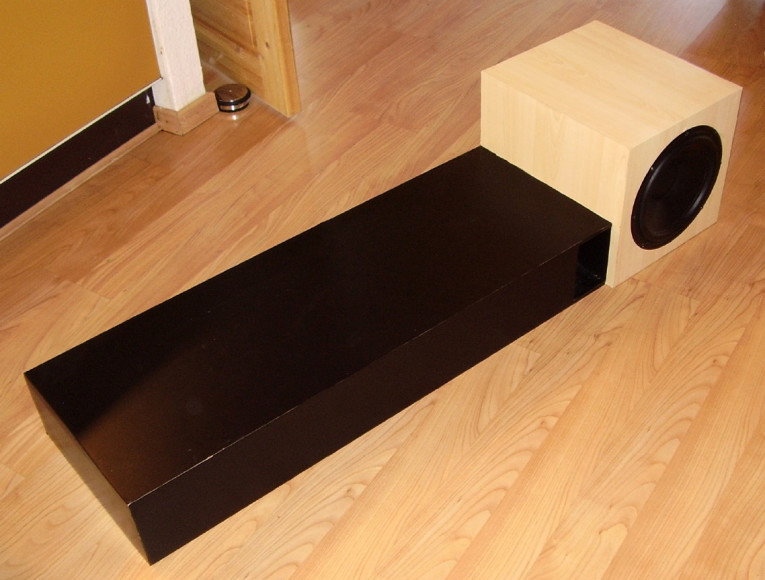
The internal cross sections are: Chamber is 34 × 30cm internally, the first part of the pipe is 23cm × 13cm, and the last part is 9 × 13cm (same as the opening). In the transmission line, the chamber is 30cm, the first pipe is 92cm, and the last pipe is 86cm. Photo 2 shows the construction. Stuffing is relatively light: 200 grams in the chamber and the first part of the pipe. The last part of the pipe (the narrow one) is not stuffed.


35 × 130
35 × 99.1
35 × 31.8
35 × 16.1
30 × 35
30 × 30
13 × 99.1
13 × 89.2
13 × 89.2
13 × 33.2
13 × 10
The front baffle is 22mm MDF: 31.8 × 31.8
Result
The updated Hideaway (Photo 1) is 5cm deeper than my first Hideaway and 10cm shorter. I made it deeper to increase the volume; otherwise, the bass would be too weak. Positioned under and against the couch (Photo 3), the sub is virtually invisible once the coffee table is in place.
The sound is, not surprisingly, as predicted by Martin J. King’s models. The bass is very deep and clean. I have not taken any measurements except with my ears, and 20Hz is still very clean and present, but has, of course, dropped a bit. I do not use the bass booster on my Hypex sub amp, which I find unnecessary.
Because the visible part of the sub is relatively small, listeners are very impressed that such deep and uncolored bass comes from such a “small” speaker.

Conclusion
It is possible to build subs with good results and for a reasonable amount of money. The Hypex sub amp (I use the discontinued HS80) and the Peerless 830668 are both very reasonably priced. Cutting the MDF cost $30. The finish is simply self-adhesive plastic folio, with a black and veneer look. Unless you’re very close to the cabinet, it looks pretty nice. This sub meets my expectations and has very good price/performance ratio.
Acknowledgment
I would like to thank Martin J. King for sharing his knowledge. I recommend the simulation models on Martin’s site.
References:
All I know about quarter wave design is thanks to Martin J. King: www.quarter-wave.com
Rob Brines articles are a must as well: brinesacoustics.com
Please also take a look at my own introduction to Martin’s work on this useful site:
www.t-linespeakers.org
This article was originally published in audioXpress, October 2007.